MIDI EVI
Embouchure
Sensor
Embouchure
Sensor

|
|
|
|
|
|
|
|
|
|
![]()
![]()
![]()
![]()
![]()
![]()
![]()
![]()
![]()
![]()
![]()
![]()
![]()
![]()
![]()
![]()
![]()
![]()
![]()
![]()

 MIDI
EVI Embouchure Sensor
MIDI
EVI Embouchure Sensor
|
If you have a Nyle Steiner MIDI EVI, you may not realize that it has an additional sensor that is currently not utilized as it is shipped from Nyle. The MIDI EVI manual does mention this controller but also states that it is experimental at this time. This controller, referred to in the manual as the "Extra Controller", is a pressure sensitive continuous MIDI controller that can be assigned to send Mod Wheel data (CC#1). Enabling it is simply a matter of holding the 2nd valve in the -2 octave and touching the Programming Button. The problem is how to actually utilize this great feature. Well, after much thought on this very question, I have come up with a solution that you can easily make and install, and it works great! Adding this mod now means the MIDI EVI has no less than THREE MIDI continuous controllers in the mouthpiece- breath, bite, and pressure! Very exciting!
This page shows you how I did it so you can try it for yourself. I plan on adding other pages like this one as I finish more exciting modifications to the MIDI EVI. So stay tuned! You can learn all about the MIDI EVI here. And be sure to visit the Nyle Steiner Homepage!
Matt Traum - Patchman Music
 Having an additional MIDI continuous
controller is a VERY BIG DEAL! As with any wind controller, the
more continuous controllers available the more expressive it
can be. Each precious continuous controller is an intimate link
between man (you) and machine (the synthesizer). Think of it
as an interface between your musical brain and what you end up
hearing. As you add continuous controllers you EXPONENTIALLY
increase the human expression since each new controller interacts
with all the others.
Having an additional MIDI continuous
controller is a VERY BIG DEAL! As with any wind controller, the
more continuous controllers available the more expressive it
can be. Each precious continuous controller is an intimate link
between man (you) and machine (the synthesizer). Think of it
as an interface between your musical brain and what you end up
hearing. As you add continuous controllers you EXPONENTIALLY
increase the human expression since each new controller interacts
with all the others.
In the MIDI EVI manual, Nyle writes:
"The EXTRA CONTROLLER has no LED and the OFFSET should be set below the point where no extra controller effect is noticed when not in use. The default of the EVI is with all EXTRA CONTROLLER effects turned off. IT IS EXPERIMENTAL AT THIS TIME. The instrument comes with the mouthpiece holder sensitized. The best way of using it that I prefer so far is to attach small plate about 1/4 by 3/4 inch so that it is near the chin. It is activated by touching against the chin with a downward angle of the instrument. The plate should be insulated with tape or thick lacquer. At present, it is up to the user to determine how to attach a sensor to the mouthpiece bracket (extra controller) and use it."
I considered this but decided to try placing the plate above the mouthpiece so that it touches the upper lip. It seemed a bit easier to implement this way. No modifications need to be done to the MIDI EVI in my version of this embouchure sensor. This page shows how I made a simple yet elegant Embouchure Sensor for my MIDI EVI. Feel free to try it yourself but obviously proceed at your own risk. If you damage your MIDI EVI Patchman Music will not be responsible!
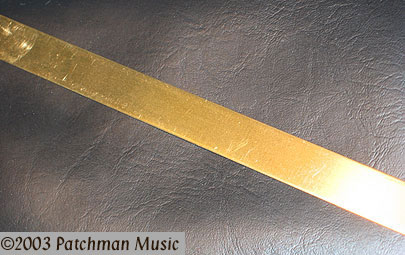
Basically you need a piece of metal 1/2" wide. I found the perfect piece at my local hobby shop. It is a brass bar that is 1/2" by .032" thick. Several thicknesses were available. I selected this thickness since it seemed strong enough yet thin enough to slip in under the EVI mouthpiece. It cost me .65¢ and since it was almost a foot long I could probably make 3 or 4 sensors out of a single piece...
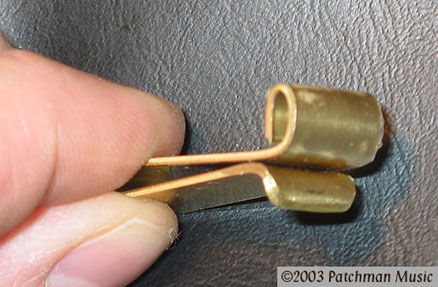
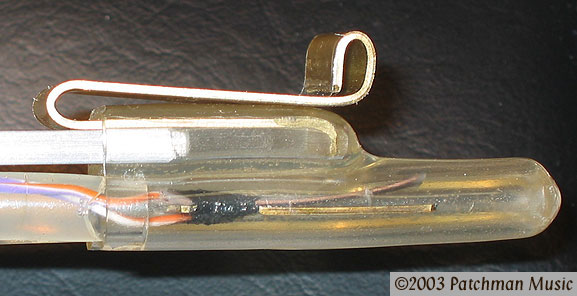
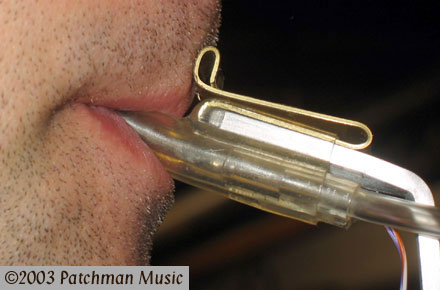
I bent the brass bar carefully to form the shape you see below. One detail: I found that having it jut toward your lip about 1/8" helps create a place for your lip to go. Otherwise the lip can feel a little "squeezed in". IMPORTANT: In the photo below, notice the clear tape over the upper front portion of the sensor. Nyle also mentions in the manual that you could use thick lacquer. Whatever you use, this is a vital step. The embouchure sensor needs to be electronically insulated from your lip. Without the tape or lacquer insulation the sensor "grounds out" to your body and won't work. (Touching the uninsulated sensor causes you no harm.)
After I applied the tape to the top portion of the sensor (simple Scotch tape will work), I very carefully trimmed the edges with a fresh new razor blade so they were approximately flush with the edge of the brass. If you can leave just a tiny bit of "overhang" this would be a good idea since you don't want to have any exposed brass where your lip touches it. This would be harmless but it would short the circuit and cause the embouchure sensor to not function properly. Do not apply tape or lacquer to the lower portion of the sensor since this part needs to make electrical contact with the mouthpiece bracket.
Also, I was careful to sand and grind the sharp edges off the bottom part of the sensor (the part that slips inside the mouthpiece) so as to not tear or damage the vinyl mouthpiece. I rounded off the lower lip and made the sides slightly narrower down there for this reason...

You can see in the view below how the front is shaped. The top is the part that touches your upper lip. Notice the clear tape over the top portion. The bottom has a slight hook that hangs over the mouthpiece holder to keep the sensor from sliding away from you when you apply pressure to it...
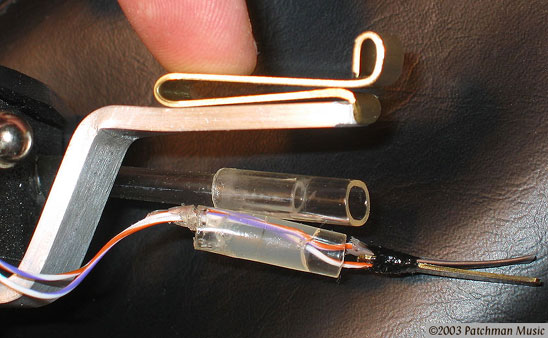
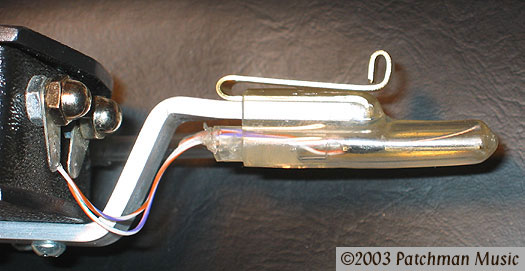
You need to carefully remove the MIDI EVI mouthpiece in order to install the sensor. Below, I am holding the sensor in place on the mouthpiece holder so you can see how it goes together. Notice how the hook hangs down over the front of the bracket. Now you can see how simple this mod really is. Basically all it does is extend the bracket "electronically" out to your upper lip...
When ready to install, you need to carefully put the pieces all back on part way to get everything to slip together. Notice how the mouthpiece is only half on at this point. (Be careful not to tear the vinyl mouthpiece). Also a VERY small amount of lubricant such as the recommended WX Recorder Cream (available here) on the vinyl tubes can help immensely getting it all back in. (Don't put any on the metal parts!)...
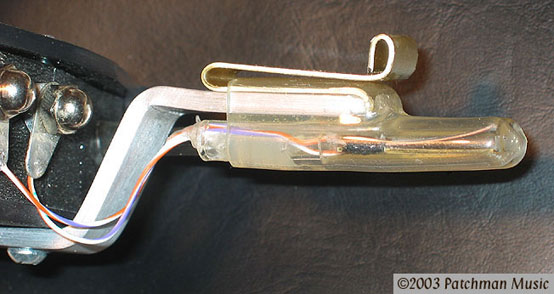
Now slide it on the rest of the way...
Another view...
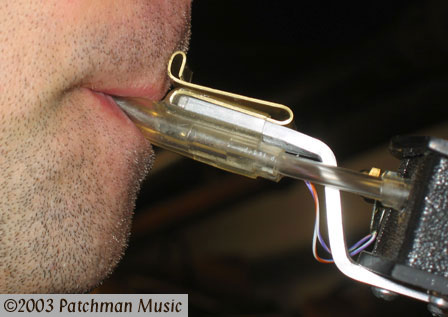
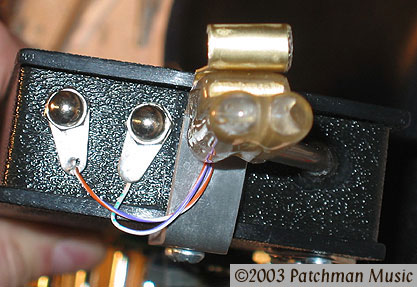
And a view from the player's perspective. You can see the insulating tape extending very slightly over the side edge of the sensor...
All set! Here is how it looks on the mouth. (Yes, I know I need a shave!)...
|
First you need to turn on your MIDI EVI and set it to send the proper MIDI controllers: The MIDI EVI defaults to sending MIDI Volume but I prefer sending Breath Controller data (cc#2) and variable velocity. So each time I turn on the MIDI EVI, I do this... Put the left hand thumb between the 2nd and 3rd octave rollers (withOUT touching the left hand ring), AND finger the 1st TRILL key AND the 3rd VALVE key, AND touch the Programming Button (furthest right hand pinky sensor).
Then I need to activate the Embouchure Sensor: To activate it, simply hold just the 2nd valve in the -2 octave position and touch the Programming Button (furthest right hand pinky sensor).
Note that you will probably need to adjust the Extra Controller Offset and Sensitivity pots on the MIDI EVI. If you have access to a PC or Mac based MIDI monitor program or a VL1, VL1-m, or VL7 (with their MIDI Monitor Display), these will help. Adjust these pots so that it feels comfortable when you send a substantial range of MIDI Controller #1 - Mod Wheel. Adjust the Extra Controller Offset so that no Mod Wheel data (value 0) is sent with the minimum amount of lip pressure on the Embouchure Sensor. Adjust the Extra Controller Sensitivity so that you can send a high value (100-127) with added lip pressure on the sensor. These pots will probably need to be adjusted again after you set up a patch on your synth to respond to Mod Wheel in an appropriate way...
|
The Yamaha VL Series synths are a perfect match for the MIDI EVI Embouchure Sensor- after all, they even have a parameter called "EMBOUCHURE"! So it is only logical that assigning Mod Wheel to the VL's EMBOUCHURE parameter would work great. This is the most logical destination for the Embouchure Sensor. With the VLs, you will also probably want to turn off the Mod Wheel vibrato that is probably programmed into the patch.
On the VL70-m:
For example, on the VL70-m, push EDIT then select Control and set the "MWLFO PMod" and "MWLFO FMod" parameter to 0 to disable the Mod Wheel-controlled LFO vibrato. And set the "Emb CC No.=" parameter to "01" and experiment with the "EmbUpprDpt", "EmbLowrDpt", and "Emb Mode" values until you find something you like. Note that there are two different ways to set the Embouchure Mode parameter. One goes from full to "centered". The other goes from 1/2 range down through centered to 1/2 range up. Pages 57-58 in the VL70-m manual explains this in more detail.
When everything is set right, you will need to apply a comfortable amount of lip pressure to the Embouchure Sensor to maintain a centered pitch. If you ease off on the pressure the pitch and/or timbre will drop very realistically like on a real acoustic instrument and/or it will sound like you are relaxing your lips. If you press harder the pitch and/or timbre will rise and/or it will sound like you are tightening your lips. Note that you can still use your EVI pitchbend sensors for even more control. In fact, these sensors all interact in very expressive ways making alternate fingering timbres a possibility (low Embouchure + high pitchbend = correct pitch but with different timbre).
With brass patches you can set the embouchure to a point where you can literally play a bugle call just from changing your lip pressure (without changing octave or note fingerings!) though this is very hard to control! On sax patches you can do that wide "laughing vibrato" you sometime hear a sax player do. You can also do fast drop offs at the end of a phrase that is very characteristic of a sax player.
On the VL series, you might also experiment with routing Mod Wheel to Growl, Scream, Tonguing, and other destinations.
Of course, Mod Wheel data can be routed to lots of things on most any synth. This Embouchure Sensor is not limited to use with just the VL series.
All VL70-m owners should definitely upgrade their VL70-m units with the amazing TURBO VL upgrade chip from Patchman Music!
|
I also find that this sensor easily allows for very subtle pitch tuning- like on a real trumpet when you are playing in a tight wind ensemble and you have to lower the 3rd of the major chord just a few cents. It seems to be a lot easier and natural to make minute pitch changes this way as compared to using the pitchbend sensors. I feel this is a pretty big deal. Wind controllers need to be able to do this in the real world. My personal belief is that anything we can add in the way of sensors to "muck up" and alter the pitch and timbre of a synth in realtime is a good thing and a step in the (right) direction of creating truly believable and expressive emulations. Synths are generally too perfect sounding for truly believable emulations. The more we can get away from perfect intonation and unchanging monotonous timbre the closer we are getting to real believability and expression.
Overall, I have found that it takes a little getting used to the MIDI EVI Embouchure Sensor but the subtle added expressiveness makes acoustic emulations all that much more believable. It really works- try it!
PATCHMAN MUSIC Home Page | Wind Controller Soundbanks
Wind Controller Links!!
 |
Be sure to check out the amazing Aerophone Academy Podcast co-hosted by Patchman Music's own Matt Traum and Alistair Parnell (iSax Academy) for in depth discussions and interviews on everything related to wind controllers! |


 |
Check out the INCREDIBLE PATCHMAN TURBO VL Upgrade Chip for the Yamaha VL70-m |

This page was last updated Wednesday, August 6, 2025
Copyright ©1996-2025 PATCHMAN MUSIC, LLC, All Rights Reserved
Purchase Terms and Conditions
All trademarks are property of their respective holders