YAMAHA VL
Programming
Guide by
Manny
Fernandez
Programming
Guide by
Manny
Fernandez

|
|
|
|
|
|
|
|
|
|
![]()
![]()
![]()
![]()
![]()
![]()
![]()
![]()
![]()
![]()
![]()
![]()
![]()
![]()
![]()
![]()
![]()
![]()
![]()

 |
Check out the INCREDIBLE PATCHMAN TURBO VL Upgrade Chip for the Yamaha VL70-m |
|
 ABOUT
THIS GUIDE
ABOUT
THIS GUIDE
This document is provided free courtesy of Yamaha Corporation of America and Manny Fernandez. It originated as a reference for YCA programmers creating voices for the VL70-m. As such, it only covers the VL1 Version 1 parameter set that is also common to the VL70-m. The new parameters added in the VL1 Version 2 software are not discussed. All parameters discussed are identical in function for the VL1, VL1-m, VL7 (Versions 1 & 2) as well as the VL70-m.
To make best use of this Guide, download / view the document and associated images from your browser software (it's one long page of html and 7 images). Print a hardcopy for reference. Feel free to save the files to your hard drive if you also want an electronic copy to reference with your browser -- some of the Tuning Page images don't print clearly in black & white, and may make more sense when you see them in color.
Also make sure you also download the accompanying example VL1/m voice file VLVOICES.sit. This is in VL v2 Expert Editor for Macintosh format. The construction of these voices is discussed in detail in the tutorial section, and seeing the Instrument Page parameters while reading the Tutorial will help you to learn how different types of voices are programmed.
This document is being released "as is" with no promises or guarantees being made to its compatibility with various browser softwares or individual computer systems. It has only been tested to be compatible with Netscape 2.01 and Macintosh System 7.5.1. Again, this version of the Editor's Guide is being provided free of charge, with no support planned by either Yamaha or Manny Fernandez for Version 1.0 (or Patchman Music).
For links to these old editors, try these links- Patchman Music VL1 / VL1-m Soundbanks page and the Patchman Music VL70-m Soundbanks page. Patchman Music tries to maintain links to these editors as best as possible.
 THE MODELING PARADIGM
Virtual Acoustic synthesis is unlike traditional types of synthesis because you are programming the physics of instrument behavior and construction (not the sound!). This reproduces in the holistic interaction of pitch, timbre and behavior which occurs in acoustic instruments.
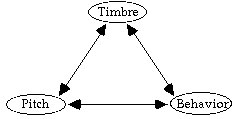
Indeed, it is the skillful control of pitch, timbre and behavior
which allows acoustic instrumentalists to create nuances and
expression in their playing that traditional synthesis cannot
reproduce.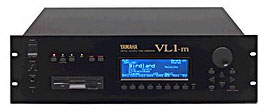
This is because traditional synthesis is based on the reduction
of sounds into discrete pitch, timbre and behavior components
i.e. Assign a tuning (pitch), choose a waveform or sample (timbre),
then alter with filter and amplifier envelopes (behavior). There
is the ability to modify behavior with realtime controllers like
Mod Wheel for vibrato, Foot Controller for filter sweeps and
the Pitch Wheel for bend articulations, but each of the effects
is discrete and does not recreate the interdependent interactions
that happen in a acoustic instrument. Programming the VA system
will put you in the role of instrument designer, and you will
need a new paradigm in your approach to creating and editing
sounds. Namely, you are no longer directly dealing with the 'sound'
itself, but instead are dealing directly with the instrument.
Thus you change the construction of the instrument to indirectly
affect the desired change in the 'sound.' For example, you are
no longer making the 'sound' brighter by opening a filter. You
are now making the 'sound' brighter by increasing the airflow
speed through the instrument, widening the flare of the bell
and changing the dampening characteristics of the wood, metal
or plastic body. The essence of VA synthesis dictates that now
the 'sound' is brighter, but it now also has a slightly different
harmonic structure, the pitch and scale temperament is altered,
and the attack/decay and legato/staccato articulation behavior
is different as well. The fact that VA synthesis always responds
with this interaction between pitch, timbre and behavior gives
it the ability to recreate the nuances and expression of acoustic
instruments.
The goal of this guide is to give you insight into the basics of the VA algorithm structure and it's interactive nature so you can create and edit sounds to your desired result, as well as provide tips and templates for generalized instrument construction. By it's design, VA synthesis emulates the real physics, so you can easily create instruments that don't, won't, or can barely play. Traditional acoustic instrument designs were created and refined over generations, and reflect refinements in design to maximize specific physical behaviors. The first time Adolphus Sax tried to create a metal woodwind, it was a far cry from a Selmer Mark VI !!
EDITOR OVERVIEW
The VED editor is divided into 7 pages of parameters, two Common pages for voice level parameters that are shared by the two elements, and five Element pages of parameters that are independently programmed for each element. These pages are:
- Common Miscellaneous Page
- Common Effects Page
- Element Controllers Page
- Element Miscellaneous Page
- Element Instrument Page
- Element Effect Page
- Element Envelopes Page
All parameter fields followed by the [>] are breakpoint scalable by note number. The number of breakpoints available depends on the parameter. This is for VL Version 1.0 software. Some Version 2.0 Parameters are not discussed (Straight Horn Insertion, etc.)
BASIC CONSTRUCTION
ALGORITHM OVERVIEW
The VA algorithm can be divided in to two types of parameter categories -- parameters that are integral to defining the physics of the instrument, and parameters that reshape the timbre produced by the given physical definition. You can think of this first group as parameters that are 'inside the model' and interact holistically in regards to pitch, timbre and behavior. Changing any one parameter to alter timbre requires a corresponding change in other parameters to keep the pitch and behavior consistent. These parameters must be edited via Software and consist of the all Element Instrument Page parameters, as well as the Throat Formant parameters on the Element Miscellaneous page (which can be edited from the VL from panel). The second group of parameters are 'outside the model' and act independent of one another as in traditional synthesis. All of this second parameter group are editable from the VL front panel. This guide will focus on the Instrument Page parameters that define the physics of the virtual instrument.
The VA model as implemented in the VL1, VL1-m, VL7, and VL70-m is based on the saxophone where a single reed mouthpiece drives a conical tube resonating body. It contains two main portions. First is the Linear system which describes the resonating body or tube, and the second is the Non-Linear system, which describes the reed behavior and airflow dynamics therein. There are additional portions that allow for the generalized sax model to be extrapolated to approximate other instrument types. The VA algorithm defines an instrument's physical behavior and is capable of creating the following behavior categories (with some examples of corresponding instrument timbres):
- Single Reeds: Sax, Clarinet, etc.
- Jet Reeds: Flute, Recorder, Shakuhatchi, Pipe Organ pipe, etc.
- Lip Reeds: Trumpet, French Horn, etc.
- Bowed Strings: Violin, Kokyu, etc.
- Plucked Strings: Guitar, Bass etc.
Double Reed instrument timbres such as Oboe and Bassoon can be produced, although the VA algorithm cannot reproduce true double reed behavior. In addition, a wide range of 'synthesizer' timbres can be created. Remember that behaviors are being created, and any specific timbre is a side effect of a given behavior.
MODE BEHAVIORS
 It
is important to understand the tuning mode behavior of instruments
when programming VA synthesis. Three recommended references are
Orchestration by Walter Piston; Horns, Strings and Harmony by
Arthur Benade; and The Acoustical Foundations of Music by John
Backus. Acoustic brass, wind and reed instruments have limited
note fingering but can play over many octaves because they change
modes i.e. the player blows the first, second, third, or fourth
harmonic overtone etc. while repeating the basic fingering. For
example, the basic fingering on a sax selects the 12 half steps
in an octave. When you play the lowest note on the sax, you're
playing the instrument in first mode. Think of it as it's 'fundamental'
mode. After you have fingered the first octave in the scale,
the register key in pressed and the pitch jumps up to another
octave -- you are now in second mode. With the same fingerings
the next octave of pitches are available. A trumpet has only
seven valve positions yet it is capable of playing over three
octaves because it can play in nine modes. Six notes can be played
in each position.
It
is important to understand the tuning mode behavior of instruments
when programming VA synthesis. Three recommended references are
Orchestration by Walter Piston; Horns, Strings and Harmony by
Arthur Benade; and The Acoustical Foundations of Music by John
Backus. Acoustic brass, wind and reed instruments have limited
note fingering but can play over many octaves because they change
modes i.e. the player blows the first, second, third, or fourth
harmonic overtone etc. while repeating the basic fingering. For
example, the basic fingering on a sax selects the 12 half steps
in an octave. When you play the lowest note on the sax, you're
playing the instrument in first mode. Think of it as it's 'fundamental'
mode. After you have fingered the first octave in the scale,
the register key in pressed and the pitch jumps up to another
octave -- you are now in second mode. With the same fingerings
the next octave of pitches are available. A trumpet has only
seven valve positions yet it is capable of playing over three
octaves because it can play in nine modes. Six notes can be played
in each position.
Since the VL notes are selected via a keyboard or MIDI, the algorithm must be programmed to automatically change modes as you play up and down the keyboard. Modes can also be selected in realtime via MIDI controllers if the virtual instrument has been properly constructed and the Embouchure Control parameters are properly set. These Embouchure Control parameters mimic the way that a wind, reed or brass player changes modes by varying their embouchure/lip tension, blow angle or breath velocity. Thus flute 'overblow' effects and trumpet 'shake' effects are possible in realtime and contribute to the dynamics and expression of a VA voice.
THE VA ALGORITHM -- PARAMETER
OVERVIEW AND DEFINITIONS
PIPE/STRING OVERVIEW
The VA algorithm resonating body consists of a mathematical approximation of a conical tube of variable length and taper as well as variable damping characteristics. It also incorporates a loss function that weakens all even-numbered harmonics to produce saxophone-type register (octave) key behavior.
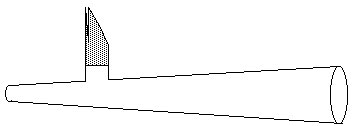
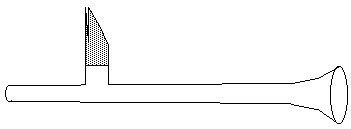
To approximate the conical tube instrument driven from the small end of the cone, the total length of a straight tube is divided into two parts, the Short Length and the Long Length. The Short Length is how far from the end of the tube that the driver (mouthpiece) is connected to the resonating body.
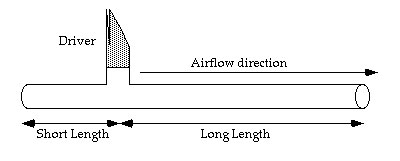
The VA algorithm actually generates different pitches by expanding or shrinking the size of the virtual instrument. The pitch depends on the total length of the tube. The VA algorithm allows for two ways for the total tube length to be determined -- by either varying both the Short Length and Long Length together, or by just varying the Long Length alone.
Parameters:
Short Length Mode -- Selects Short Length tracking mode. Relative mode means that the Short Length changes relative to pitch of the instrument, so that the Short Length/Long Length are changing together and their ratio remains constant for any pitch, similar to a trombone or a slide whistle. Absolute mode means the Short Length is fixed at its programmed value regardless of pitch, with only the long length changing. Thus the Short Length/long length ratio is variable with each pitch. This is similar to opening/closing the tone holes on a sax or clarinet, etc.
Short Length/Ratio [>] <16 Breakpoints> -- (See Figure 1) This is the distance from the closed end of the conical tube at which the driver connects, and is the primary origin of the harmonic structure of the sound. The Short Length sets the template of possible harmonics in the sound. The distance of the driver from the closed end of the tube creates reflections that will phase cancel or weaken certain harmonics. For example, if the Short Length is set to 25% (of the total length), all 4th order harmonics will be significantly reduced or missing, similar to a pulse wave with a width of 25%. Also the harmonic mode capabilities are dependent on the Short Length. Longer Short Length settings have less harmonic mode possibilities compared to shorter Short Lengths, as more harmonics are missing or weakened at longer Short Lengths. The 25% example would create an instrument that cannot play in 4th, 8th, 12th mode etc. as the 4th, 8th, 12th etc. harmonics will be significantly damped. A multimode instrument such as French Horn (up to 15 modes !) will generally have a much shorter Short Length than a Clarinet that typically only plays in first and third modes.
Absorption [>] <8 Breakpoints> -- This filter sets the cutoff frequency for the harmonics that reflect back into the tube at the open (bell) end of the instrument. The open (bell end) of an instrument causes an acoustical reflection of the sound wave because the rapidly expanding diameter of the tube at the bell creates a virtual nodal point similar to that at the closed end of the tube. In physical terms, this parameter controls the ratio of conical tube taper to bell flare:
This parameter has a great effect on the pitch of given notes of an instrument, and the effect is more pronounced with higher pitches. Always re-initialize the tuning after making significant changes in the Absorption.
Damping/Decay [>] <6 Breakpoints> -- This parameter has two settings; one key-on value and one key off value. It controls the damping of the sound wave as a function of the friction between the moving air and the tube walls. As the friction increases (the Damping/Decay decreases), the sound loses energy faster, thus it 'decays' more quickly (if you think of 'decay' as in an ADSR envelope). The Decay setting gives the value for the system while a key is being held, and the Damping setting gives the value for the system when the key is released.
Register Key Open -- This selects the note at which the register (octave) key opens. Again, since the VL notes are selected via a keyboard or MIDI, the algorithm must be programmed to know what pitches require the resister key to be open as you play up and down the keyboard. All notes at and above the value set here play with the 'register key open'.
Low/High Mode balance (1st Harmonic Damp) [>] <4 Breakpoints> -- This parameter controls the loss of harmonic energy that occurs for notes at and above the value set for Register key open. Because the VL algorithm is based on a sax, this controls the loss of energy in all the odd harmonics. This recreates the octave pitch shift between a given note and the same fingered note with the register key added. In contrast, a clarinet is a cylindrical instrument instead of a conical instrument, and it has a different mode behavior. It's register key causes a shift of an octave and a fifth with a given fingering because it dampens all even harmonics.
DRIVER OVERVIEW
The Driver portion of the VA algorithm defines the physics of airflow into the instrument. The algorithm takes the value of the MIDI controller assigned to Breath Pressure (see Element Controller Page) and converts it into 'virtual airflow' in real time as specified by these parameters. The 'virtual airflow' now exhibits the physical behaviors created by these parameters. The 'virtual airflow' then interacts with the reed of the instrument.
The Child Reed is the equivalent to the single reed of a sax, the lip edges on a trumpet, the air jet over a flute, etc. It vibrates at a given fundamental frequency in response to the ' virtual airflow'.
The Parent Reed is an extension to add the influence that a players' lip mass has over the vibrating lip edges in brass instruments.
Embouchure Control is the realtime response of the reed and airflow behaviors to an assignable MIDI controller -- it allows for the algorithm to create timbre and behavior responses to changing embouchure, which is the player's muscle tension and position on the mouthpiece. An acoustic instrument player's realtime control of their embouchure is a major determinant of their individual 'sound'.
Pressure Control allow for the Breath Pressure to control some of the Embouchure Control parameters.
Beat is an extension that adds the physical effect of the oscillating reed hitting against the mouthpiece edge.
Excitation is an extension that enhances plucked string simulations, and defines the shape of the 'pluck'.
Compensation allows for Breath Pressure to control pitch. It 'compensates' for the natural pressure/pitch interactions created by the algorithm. Acoustic players are always adjusting their embouchure in realtime to maintain stable pitch at all pressure and dynamic levels.
Pipe Length consists of the delay settings that create the tuning of each individual note (see Tuning Page).
Driver Parameters:
Pressure Input Gain [>] <8 Breakpoints> -- This controls the gain of the incoming 'virtual airflow' derived from the MIDI controller set to control Breath Pressure. Simply, it allows for control over how hard or soft the system is being blown. High values give brighter and louder sounds, but often the harmonic details can get lost -- especially those from subtle variations in Breath Pressure. At low values, the response is more dynamic, but the instrument may be more difficult to play. Also, note that multimode instruments will tend to have low values for Pressure Input Gain as it is important not to overpower each individual mode frequency of the reed.
Pressure Level to Reed [>] <5 Breakpoints> -- This controls how much of the reed surface area is influenced by breath pressure. Think of a player resting their lips around the mouthpiece and reed. As the mouthpiece is moved in and out of the player's mouth, more or less of the reed is covered by their lip. Higher values mean that more of the reed area is exposed to oscillate freely. In general, low values will give faster generation of the fundamental and accurate harmonic intervals. High values will usually give faster attacks, but also the tendency for the reed to jump to different harmonics, and harmonic overtones have a tendency to be slightly out of tune.
Slit Sign -- This parameter determines which direction the reed oscillates from it's rest state. Positive (+) means that the reed oscillates by closing towards the mouthpiece with Breath Pressure. Negative (-) means that the reed oscillates by opening even further from the mouthpiece with Breath Pressure -- or think of it as playing the instrument by sucking rather than blowing !
Additional Reed Aperture -- This adjusts the at gap between the reed and the edge of the mouthpiece when the reed is at maximum closure. Can effect the loudness and brightness of a sound. If set too high, the system may begin to self-oscillate even after Breath Pressure drops to zero. Not to be confused with Slit Initial Aperture.
Slit Saturation Feedback Balance -- This controls the balance between inner (simple) and outer (complex) versions of slit saturation feedback, which is the mathematical portion of the model governed by the Mouthpiece Narrowness parameter (see Embouchure Control, below). The timbre and behavior differences between inner and outer depends on the actual values set for Mouthpiece Narrowness -- the higher the values for Mouthpiece Narrowness, the more distinct the inner and outer versions become. Outer is more dynamic and tends to be better for sax-style voices.
Graham Function Argument [>] <5 Breakpoints> -- The Graham Function is actually the mathematical description of the fluid dynamic effects of a medium, in this case air, flowing through a gap, where there is a given pressure differential on either side of the gap. In the VA algorithm, this value controls how quickly the airflow reaches saturation (maximum flow velocity) at any given Breath Pressure input. The effect of this parameter is highly interactive with the Slit Initial Aperture, Mouthpiece Narrowness, and Reed Flexibility in determining the airflow speed through the system. Simply, the airflow speed through the system is a multiplication of the air pressure and the Graham / Embouchure Control parameters. The overall timbre and behavior of the instrument is highly dependent on airflow speed -- the potential harmonic structure created by the Short Length setting is highly modified by the Graham/Embouchure Control parameters. The Short Length setting selects the possible harmonics, and the Graham/ Embouchure Control parameters are the major determinant of their amplitude and behavior. General suggestions will be presented in "Modeling Tips", and "The Circle of Life."
Driver Output shut off -- When set to 'shut off' the output from the Driver is forcibly set to zero at zero Breath Pressure input. When set to 'through', any energy from the Driver that remains after Breath Pressure reaches zero will continue to drive the Pipe, as dictated by the max/min values of the Damping/Decay. This can make for subtle attack variations, especially in repeatedly tongued notes.
Driver Output Level [>] <5 Breakpoints> -- This is the overall output gain of the Non-Linear driver. Higher values give louder, brighter sounds. However, this parameter interacts with the Graham Function Argument parameter in producing chaotic (non-harmonic) noise components in the sound. Too keep the instrument 'chaos free', the sum of the Graham value and the Driver Output value should be close to zero. If the sum is too greatly positive, the sound will have pronounced chaotic noise components.
PARENT REED OVERVIEW
The Parent Reed parameters are an extension in the VA algorithm to improve the synthesis of lip reed (brass) sounds. This is because the oscillating edges of the lips that function as the 'reed' of brass instruments are influenced by the mass of the lips as a whole. Since the mass of the lips as a whole is much higher than the edges, their oscillation frequency is much lower, and typically will not oscillate to the extent to cause resonance. This effect usually manifests as a brighter, buzzier sound, and occasionally as subtones. In extreme settings the Parent Reed can oscillate well into the audio range and can produce a bright, 'biting' FM like metallic character to the tone.
Parent Reed Parameters:
Force to Parent Reed -- Controls the gain of pressure input to the Parent Reed. Higher values tend to be brighter.
Output Level -- Controls the overall output from the Parent Reed. Higher values tend to be brighter and attack more quickly.
Lip Collision [>] <5 Breakpoints> -- This parameter simulates the repulsing, or rebound effect of the lips colliding against one another while they oscillate. Low values are 'soft' collisions, like bouncing a rubber ball on carpet, while high values are 'hard' collisions, like bouncing a marble on a glass table. High values tend to be brighter, but the net overall effect is dependent on the Parent Reed cutoff frequency as well. Interestingly, with negative settings, the lips can be made to collide through one another, yielding interesting and strange results, especially if the Addition to Slit opening is high.
Cutoff [>] <5 Breakpoints> -- Sets the LPF cutoff frequency of the Parent Reed. The sloped line in the key scale window is the baseline for the fundamental frequency. The combined values for this parameter and the Lip Collision parameter can create noise-like chaos in the system if both are set too high.
CHILD REED OVERVIEW
The Child Reed is the equivalent of the vibrating reed of the mouthpiece. Its thickness, flexibility, aperture, response to airflow, etc. are very important to creating the behavior of a sound. It has both static and dynamic characteristics, with the dynamic characteristics vitally important to the controllability that the player has over shaping the sound, both timbrally and behaviorally. The Dynamic parameters are grouped under "Embouchure Control" below. The following parameters comprise the static parameters
Child Reed Parameters:
Force to Child Reed -- Controls the gain of pressure input to the Child Reed. Higher values tend to be brighter.
Reed Displacement Output Level -- This is the amount of energy output from the Displacement portion of the Child Reed. The VA algorithm allows for two different mathematical methods to determine the output energy of the Child Reed. One type of output energy is determined by its displacement at any given moment in time, like the stored energy in a stretched spring. The other is the output energy determined by its momentary velocity, or momentum. Depending on the specific type of reed being modeled, either Reed Displacement Output or Reed Velocity Output (or some blend) would be more accurate. Reed Displacement Output is typically used for Single Reeds and Bowed Strings. Higher values tend to be brighter and attack more quickly.
Reed Velocity Output -- This parameter controls the output energy determined by the velocity of the Child Reed as mentioned above. Reed Velocity Output is typically used for Jet Reeds.
Resonance Control -- Selects keyboard tracking the mode for the Child Reed Resonance frequency. Absolute means that the reed pitch is set to the true values of the Child Reed Resonance frequency parameters. Relative means that the frequency of the Child Reed tracks the keyboard, with the fundamental pitch (Child Reed cutoff) being set relative to the overall tube length as determined by the Pipe Length settings created in the Tuning sub page. A by-product of this setting is the appearance and function of the Tuning sub page Initialization window. See Child Reed Cutoff and Tuning.
Resonance Lag Time -- The controls the speed at which the Child Reed changes frequency when different notes are selected via the keyboard. Most useful for brass instruments where the pitch played is highly dependent on the constantly changing tuning modes at which the lips oscillate. When set too high, it resembles portamento.
EMBOUCHURE CONTROL OVERVIEW
The dynamic aspects of Child Reed behavior are defined here. The following five parameters allow for setting low and high limits for their values as determined by the real time position of the MIDI controller assigned to Embouchure Control on the Controllers Page. The purpose of allowing realtime control is to recreate the dynamic embouchure of the acoustic wind player. The tightness of the lips and their position on the mouthpiece greatly influence the timbre and behavior of the sound. The low limit values are output when the controller is at minimum, with the high limit values being output with the controller at maximum.
Each instrument behavior type -- single reed, jet reed, lip reed etc., have very specific ways that these parameters change whether the player uses a 'loose' embouchure (controller at minimum) or 'tight' embouchure (controller at maximum). For example, in a sax, if the embouchure tightens, then:
Slit Initial Aperture and Mouthpiece Narrowness both decrease, as the lip pressure closes down the reed.
Reed Flexibility also decreases because the reed has effectively become thicker and less flexible.
Child Reed Resonance Frequency goes up because the effective length is shorter, and thus it vibrates faster.
Child Reed Resonance Amount goes down as the reed is being somewhat damped by the increase in lip contact area.
This is the general rule for single reeds --however this is a strict interpretation, and you can set the algorithm to respond any way that gives a satisfactory result. See "Embouchure Control Tables" for strict examples of various the VA instrument types.
Embouchure Control Parameters:
Slit Initial Aperture [>] <8 Breakpoints> -- This controls the position of the reed at neutral pressure, where breath pressure input is equal to the back pressure in the system. If you think of a simple harmonic oscillating system such as a pendulum, the normal neutral state is at the perpendicular, on-axis position. Slit Initial Aperture is analogous to the initial horizontal displacement of dragging the pendulum off-axis prior to starting oscillation. Increasing the Slit Initial Aperture shifts the reed more toward its maximum closure for a given pressure input. Of course, this assumes the slit sign is (+). The inverse condition is true for negative Slit sign.
Mouthpiece Narrowness [>] <8 Breakpoints> -- This controls the hysteresis effect -- the tendency of the reed to 'stall' at it's physical limit of movement. A wide mouthpiece (high values) creates less back pressure to help open the reed, so the reed 'stalls' more giving a brighter sound. A narrow mouthpiece (low values) creates greater back pressure, so the reed does not have as much 'stalling' tendency because the back pressure helps to open it after maximum closure. This gives a darker sound. Mouthpiece Narrowness directly interacts with the Slit Saturation Feedback, which is separated into an inner (simple) and outer (complex) feedback loop for greater versatility, selected by the Slit Saturation Feedback Balance parameter. Inner feedback is generally brighter, with more simple harmonics. Outer feedback is more correct to the strict model and gives a more complex harmonic spectra, though somewhat darker. Increasing this parameter makes the differences between inner and outer Slit Saturation Feedback more distinct.
Reed Flexibility [>] <8 Breakpoints> -- A more flexible reed is able to undergo changes in its vibratory state more rapidly. Thus, as the value of Reed Flexibility increases the reed is capable of making these faster transitions, giving a brighter sound that generally will have a faster attack transient. Also, can be thought of as the reed thickness, keeping in mind that more flexible reeds are thinner .
Child Reed Resonance Frequency [>] <12 Breakpoints> -- This sets the vibrating frequency of the Child Reed. This interacts with the Short Length setting to create the basic harmonic structure. If the Child Reed Resonance Control mode is absolute, then this sets the true resonating frequency in Hertz. If the Resonance Control mode is set to relative, then the values are given in octaves relative to the 'fundamental' frequency as determined by the Pipe Length settings. At a setting of zero (in relative mode), the Child Reed frequency is exactly the same as determined by the Pipe Length setting for the tube length/pitch.
Child Reed Resonance Amount [>] <12 Breakpoints> -- This sets the amount of Child Reed resonance, or how much energy it has in it's resonating state. This setting is important when creating mode selection via Controllers that change the Child Reed Resonance Frequency. Even if you cause the Child Reed Frequency to jump two octaves with the correct settings for the Embouchure Controlling, Child Reed Resonance Frequency parameters, the mode may be out of tune, weak or not heard if this resonance amount setting is too low. The reed needs more energy to resonate in the higher modes. Another way to look at it is at higher resonance settings, the Child Reed has a greater tendency to lock to one of the allowed harmonics determined by the Short Length. At lower settings, the reed can remain 'out of tune' relative to the Short Length, and create out of tune harmonic structures. Also, higher settings are brighter.
PRESSURE CONTROL OVERVIEW
Similar to the embouchure Control parameters, acoustic players naturally change their embouchure in concert with how hard they blow. These parameters allow for certain related Child Reed parameters to be controlled by Breath Pressure. The parameters are variable from zero to 16. When set to 16, then the dynamic range is the full differential between the low and high limits. Values from 1 to 15 are preset fractions of the total dynamic range defined by the low and high limits. These two parameter's net result interacts with the corresponding net result of the Embouchure Control parameters to give the realtime value for Reed Thickness and Child Reed Resonance Amount.
Pressure Control Parameters:
Pressure to Reed Thickness -- This allows for Breath Pressure control of Reed Flexibility
Pressure to Reed Resonance -- This allows for Breath Pressure control of Child Reed Resonance Amount.
BEAT OVERVIEW
Beat is for simulating the sound of the reed collides with the mouthpiece edge. It helps in making sound brighter and more buzzy. When set improperly (or 'properly' if that's what you want !), Beat has the ability to drive the system to such an extent to override the effect of the Child Reed/Parent Reed drivers. Much subtlety and detail will be lost in the sound, and it's dynamic behaviors will be severely altered. Similarly noise and other chaotic elements that are essential to 'acoustic' sound will be masked as well. Beat is best used in moderate amounts.
Beat Parameters:
Amount [>] <8 Breakpoints> -- This parameter controls the overall Beat amplitude. It has both positive and negative value settings. Similar to slit sign, negative beat values simulate vibration in the opposite direction. In general, sounds have the same sign, + or -, for Slit Sign, Parent Reed Lip Collision and Beat Amount. Interesting things will result if the signs are mixed, and the sound can be very unstable and unpredictable !! Also, Beat, like Throat, can interfere with the accuracy of the auto tuning, so final tuning must be done manually. See Pipe Length.
High Frequency Emphasis [>] <6 Breakpoints> -- This sets the tuning of the Beat effect. Since the intent of Beat is to add high-end brightness, the usual approach to setting the beat emphasis is to match the approximate frequency of the Parent/Child Reed. This allows the for the addition of the Beat brightness without having the Beat override the Child/Parent Reed driver's behavior. If the Beat emphasis is set too low for a given Beat level, then the Beat pitch can overwhelm the Parent/Child Reed drivers and introduce inharmonicities into the sound.
EXCITATION OVERVIEW
Excitation creates an energy 'impulse' that can be used to start the VA algorithm oscillating without pressure input. The intent is to provide a burst of energy to help start oscillation when breath is applied. This is because some types of sounds require a burst of pressure to start sounding, and may not sound or may attack too slowly with less drastic pressure increases. Excitation mimics the 'plosive' effect (as in 'explosive') of letting your breath exhale after momentarily letting the pressure first build in your cheeks. Say the word "pump". The sound of the 'p' is created because of the 'explosive' pressure that builds up as your lips do not open until a split second after your diaphragm as exhaled. Compare the sound of the word "pump" to the word "hump". The word "hump" sounds only with the release of breath from your diaphragm because your lips are already open -- it's attack transient is purely dependent on your diaphragm strength. Excitation is triggered only by key on, and consists of a variable width pulse waveform. It's output can be applied either to the reed or to the pipe.
Excitation Parameters:
Level to Pipe [>] <3 Breakpoints> -- This controls the amount of excitation applied to the linear portion. This can allow for the creation of 'plucked' sounds without any output needed from the Parent/Child Reed drivers.
Level to Reed [>] <3 Breakpoints> -- This controls the amount of excitation applied to the reed. This helps start the Parent/Child Reed to oscillation with an added pulse of energy.
LPF Cutoff Frequency [>] <3 Breakpoints> -- This is a standard lowpass filter to control the brightness of the pulse waveform used for excitation.
Velocity to -Level Sens. -- This controls the key-on velocity response of excitation output. A setting of zero means the level will not respond to key velocity, a setting of 16 gives maximum dynamic response.
Velocity to -Filter Sens. -- The excitation lowpass filter cutoff can also be dynamic to key-on velocity. Zero means no dynamic response, 16 gives maximum dynamic response.
Velocity to -Width Sens. -- The excitation waveform pulse width can also be dynamic to key-on velocity. Zero means no dynamic response, 16 gives maximum dynamic response.
Pulse Width [>] <3 Breakpoints> --This sets the basic pulse width of the excitation wave.
COMPENSATION OVERVIEW
All natural instruments exhibit pitch variations with dynamic level. One of the first skills learned by any player is control of pitch at various dynamic levels, accomplished by micro adjustments in their embouchure. Once learned, this becomes essentially automatic for the player. The VA algorithm accomplishes this automatic correction of pitch with dynamic level with three parameters -- Compensation, Pressure to Slit sens. and Pressure to Resonance sens. Pressure to Slit sens. and Pressure to Resonance sens. were discussed above previously and are concerned with the reed dynamics to pressure. Compensation controls the pitch/dynamic range stability, and it directly changes the overall system tuning in response to pressure input.
Compensation Parameters:
Pitch Compensation [>] <12 Breakpoints> -- It is natural for most instruments to play a bit flat at low dynamic levels and to get more sharp as they get louder. Setting compensation levels positive will make the pitches at low breath pressure become more sharp relative to the maximum breath pressure pitch. Conversely, setting negative compensation values will make the low breath pressure pitch more flat relative to the maximum breath pressure pitch. Depending on the settings of Pressure to Reed Thickness and Pressure to Reed Resonance, the Beat and Throat settings and Child Reed Velocity Output, there can be odd fluctuations both flat and sharp in the middle pressure ranges. High amounts of Beat and Throat also cause unpredictable low pressure tuning variations.
PIPE LENGTH OVERVIEW
The Pipe Length settings are the stored Total Delay tuning values for each note. They are accessed via the "TUNE" button on the Instrument page. The tuning window has two displays depending on the Child Reed Resonance Control mode. In both the "Relative" and "Absolute" Child Reed mode versions the group of black horizontal lines that slope down to the right are the mode lines. Modes 1 through 5 are displayed. Modes 6 and above are too close to resolve, so are not displayed though they are present. The version displayed when the Child Reed Resonance Control mode is 'relative' shows three red outlined boxes connected by red lines that overlap the mode lines:
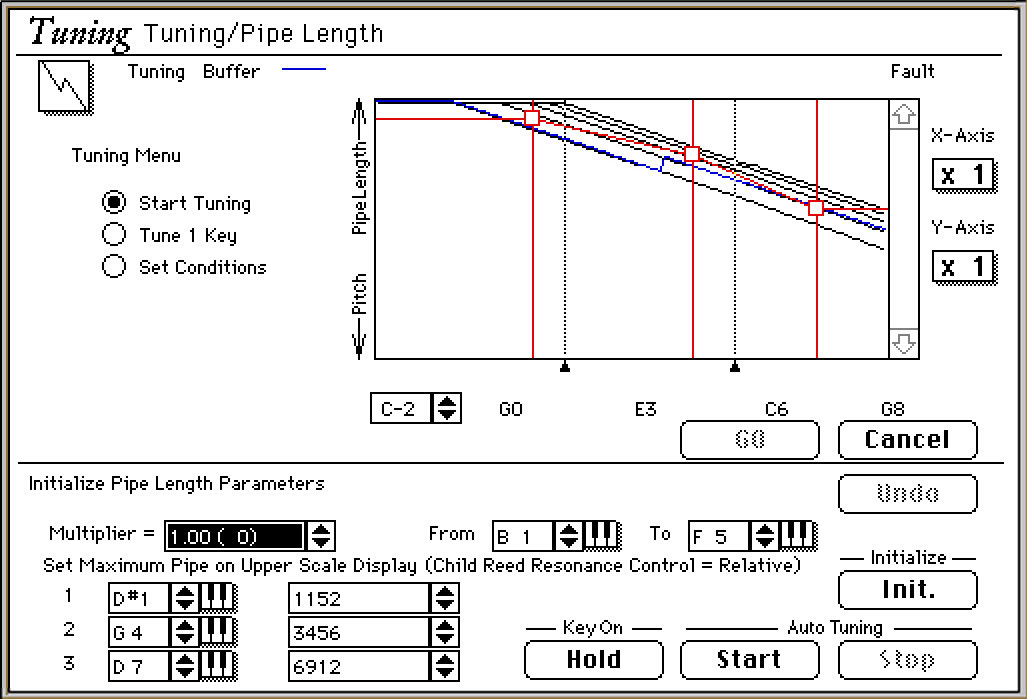
The red boxes are used to set the desired mode when initializing the tuning table for the instrument. The additional values in the lower left corner of the tuning window show the key number and delay value for each of the three boxes. There are three sub pages of the tuning page, selected by choosing the desired "bullet"-- "Start Tuning" (shown above), "Edit 1 Key" and "Set Conditions."
Start Tuning: This is where you initialize the total delay tuning table and run the auto tune function. The slope of the mode lines and the amount of curvature is a byproduct of the Absorption cutoff frequency value, and its only importance is that it shows that at lower Absorption values, some pitches will sound only in higher modes because of the increased energy loss. Set the desired ranges and modes, set the multiplier (see above, Pipe Length Overview) and click the "Init." button to initialize the tuning table to the set parameters. Similarly, click on the "Start" button to run the auto tune function. To save the results, click on the "Go" button, and the tuning table will be stored and you'll exit out of the tuning page. NOTE: If you ever try to exit the tuning page via "Cancel" and you have tuning table values that have been changed, you will be shown a dialog to either Save or Discard the changes before exiting.
Instruments that use 'absolute' Child Reed mode are not usually multimode instruments, and their basic modal structure template will be first mode and second mode. Note you cannot set the desired mode with the red boxes as when the Child Reed Resonance Control mode is set to Relative:
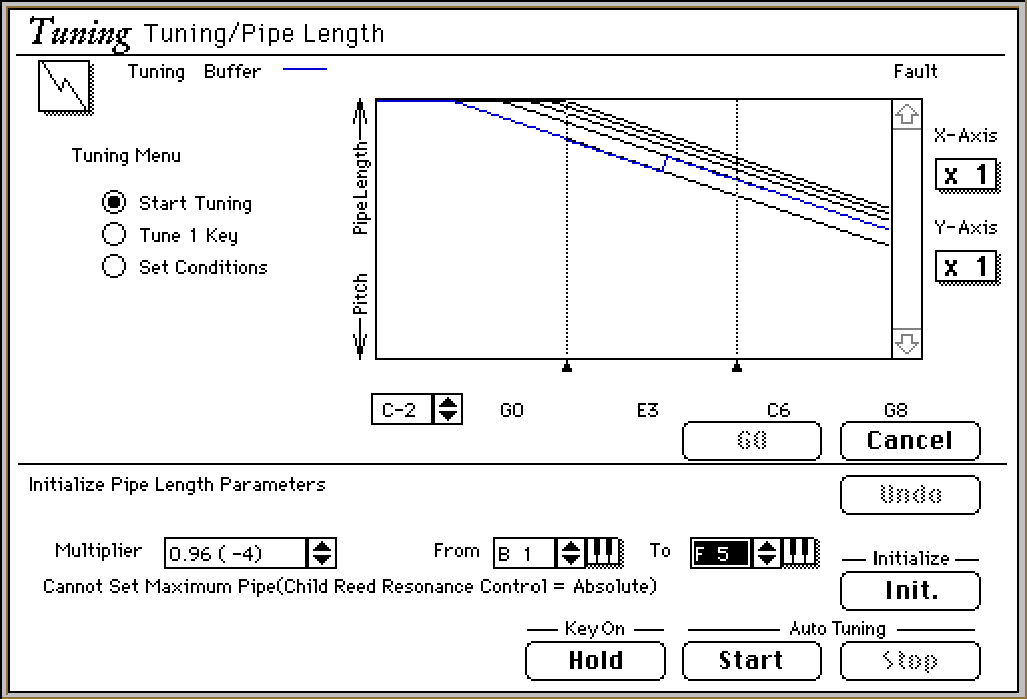
The note where the mode change occurs is determined by the Register Key Open parameter. The actual modes after initialization depends on the Multiplier value. If the multiplier is set to 1.00 (0), then the tuning table will initialize to first mode for all notes below the Register Key Open note, and to second mode for all notes at and above the Register Key Open note. If the multiplier is set to 1.98 (63), the table will initialize to second mode for all notes below the Register Key Open note, and to fourth mode for all notes at and above the Register Key Open note. By using the high and low key range values and the proper multiplier values, the initialization when in Child Reed absolute mode can create modes 1/2 , 1, 2, 3 and 4. (1/2 mode is the sub-octave below the fundamental Child Reed frequency).
In multi modal instruments that use 'relative' Child Reed mode, the aforementioned boxes on this sub page choose the note ranges and desired modes, and the Register Key open parameter has no effect on the tuning table initialization. Again, by setting the boxes on the appropriate mode lines and choosing various multiplier values, modes 1/2 through 10 can be initialized. Note that the line connecting adjacent boxes must be on or slightly above the desired mode line to select that mode.
Since the Child Reed cutoff mode is used as a reference for initialization, if you wanted to make a 'absolute' Child Reed instrument that plays in modes 5 and above, simply change the Child Reed cutoff mode temporarily to relative for tuning initialization, then change it back to absolute for the remainder of voicing and final tuning.
Tune 1 Key: This page allows for tuning of any one key manually by directly accessing the delay settings. The best way to go when final tweaking a voice in the 'Circle of Life.' High amounts of Beat and Throat tend to create auto tune errors and are best tuned by hand. Change the tuning of the selected key sharp or flat via clicking on the appropriate arrow(s). You can also auto tune a selected key by clicking the "Start" button. You may notice in Multimode voices that as you try to tune a note that is flat, it gets sharper and sharper until just below the desired pitch and then it jumps down suddenly in pitch -- what has happened is that it has manually jumped into a new mode. This tells you that given key cannot be in tune to that pitch in the given mode for the given Short Length, Child/Parent Reed and Absorption parameters. Remember to select the "go" button to save your changes.
Set Conditions: Sets the parameters for the auto tune software. These are too complex to go into here, suffice it to say that it is best to leave them at their default settings. It's much easier and faster to run the 'Start Tuning' procedure and then tweak via Edit 1 Key than to try to find the exact values that will auto tune any specific instrument. However, if you like to experiment, you have the ability to save and load any different settings that yield good results for you. The first time you open the Expert Editor, there will be all zeros entered for the Input Gain, Resonance, PLL Gain and Input Gain of Integrator, and the Auto-tune will not work properly. The correct default values are:
BPF: Multiplier:
Input Gain = 91 PLL Gain = 1.00 (0)
Resonance = 8.01 (96) Input Gain of Integrator= 1.00(0)
Enter and save these values so you have the proper default conditions.
THROAT FORMANT OVERVIEW
The Throat Formant parameters recreate the influence that the player's Throat and trachea has on creating formants in the sound. Think of it as an extra piece of pipe that can placed before the reed, and as such it consists of a basic resonating system. Throat is very useful in creating harmonic characteristics that make the final voice sound 'more acoustic'. Also, it is very good at creating some of the unusual overtones present in the upper registers of wind instruments as well as other effects such as the 'honk' or 'growl' effect of a sax.
Parameters:
Pitch Tracking -- Selects the tracking mode for the Throat delay. Similar to Child Reed Resonance Control mode. Fixed mode gives frequencies as specified by parameter settings. Key Track mode gives octave values relative to the fundamental pitch of the sound.
Pitch [>] <8 Breakpoints> -- Sets the delay parameter values that create the Throat pitch. When in Fixed mode, the sloped line indicates the fundamental pitch, and the true frequencies are set in Hertz. When in relative mode, the values automatically track keyboard pitch, and the range is +/- 2 octaves relative to the fundamental.
Intensity [>] <4 Breakpoints> -- This is similar to the Damping/Decay of the Instrument linear system. It controls the friction of the air in the Throat. Higher values mean less friction, and therefore a brighter waveform will result from the Throat output.
Amount [>] <4 Breakpoints> -- Controls the breath pressure input gain into the Throat system. High values give brighter and louder Throat waveforms that will be output into the instrument as a whole. Remember that the actual Throat output is controlled via the Controller Page, with Throat level determined by either a fixed set value or dynamically modulated by a controller.
HPF [>] <3 Breakpoints> -- Unlike the Pipe portion of the Instrument page, the Throat system has an adjustable high pass filter to alter the transmission of low frequencies in the Throat waveform. It controls the cutoff frequency of the Throat waveform reflected back into the Throat system via a high pass filter. This parameter can be also used as a secondary tuning in conjunction with the delay settings, especially at high input gain and Throat LPF settings.
LPF [>] <3 Breakpoints> -- This parameter is similar to Absorption on the Instrument page in that is sets the cutoff frequency for the portion of the Throat waveform to be reflected back into the Throat system via this lowpass filter. The reasoning for including both HPF and LPF control for Throat is to allow for more specific selection of frequencies within the Throat waveform. Generally, the HPF and LPF value will be set up to create a narrow band pass type filtering of the Throat waveform.
LET'S MAKE A MODEL!!
Programming a new voice will be done either from tweaking an existing voice or creating one from scratch. From programming other synthesis systems from scratch, you are familiar with the 'Init Voice' concept where there is a preset condition of a very basic voice. The concept of an 'Init Voice' is different in VA synthesis. For one, the amount of programming from default values that must be done is significant, as some very specific programming must be done to create a model that plays predictably in the first place! Second, since general instrument behavioral structure can be quite different (flute versus trumpet for instance), each behavior category requires a different initial state to minimize the amount of programming. For convenience, consider five different 'Init Voices':
- Init Reed (a single reed)
- Init Jet (a jet reed)
- Init Lip (a lip reed)
- Init Bowed (a bowed string)
- Init Pluck (a plucked string)
Each of these five 'Init Voices' have significantly different relationships in the values for their Instrument Page parameters, including their total delay tuning and modes. The five aforementioned 'Init Voices' are provided in the VL Examples file, along with voices to use as study examples.
Regardless, if you are starting from an existing voice or one of these 'Init Voices', there are many suggestions and tips for achieving some desired changes in the sound. They can be grouped into two groups: Timbre-only modifiers and Behavior/Pitch/Timbre modifiers.
The timbre-only modifiers will affect the timbre only without causing any pitch or behavior changes in the sound, and include:
- Tap
- Harmonic Enhancer
- EQ
- Impulse Expander
- Resonator
These areas can cause drastic changes in timbre, yet the given behavior and pitch will not be affected.
The behavior/pitch/timbre modifiers will affect the behavior components, with side effects relative to the pitch and timbre, and include:
- Throat
- Instrument Page
- Pitch EG
- Embouchure EG
These are the areas that will affect the voice as a whole, in any part, with of course the interactive 'side effects' inherent in modeling.
VL MODELING TIPS & TUTORIAL
The following are tips and tutorial voice examples related to the five behavior types of which VA algorithm is capable, and represent the 'scientific' approach to these types of voices.
General Single Reed Tips
Reference voice Init Reed
Definitive characteristics of the single reed family include moderate to high Absorption cutoff, use Displacement Child Reed output, Child Reed Resonance Control absolute mode, Short Length absolute mode (with a wide range of possible lengths). The overall timbre will be created by the Short Length and Tap settings. Since the VA algorithm is tailored for the single reed, all of the Driver, Child Reed and Embouchure Control parameter values will typically have a wide range of possible settings. The Feedback Balance will usually be towards outer, but a mix of inner can make the sound brighter. Slit Initial Aperture, Mouthpiece Narrowness and Reed Flexibility will be in the middle parameter value ranges, as well as Child Reed Resonance Amount. One important characteristic of single reeds is that the reed frequency is always slightly above the resonating frequency of the Pipe. Therefore, the Child Reed Resonance freq. will be at or above 'the line' (remember that the sloped line in the Child Reed Resonance Freq. key scale window is the fundamental pitch line). The example voice Init Reed has moderate settings for the Driver, Child Reed and Embouchure Control parameters. Beat can be used to enhance the brightness of the sound, and to impart some small amounts of inharmonicities in the sound. Reference the voice Init ReedB. This is essentially the same as Init Reed except for the addition of Beat. Notice how Beat improves the sax-like character of the sound.
Creation of double reed voices is a timbral edit rather than a behavior edit on the VA algorithm (remember that double reed physics cannot be approximated by this model). Generally shorter Short Lengths, more use of variable Tap, and use of the Harmonic Enhancer will transform any single reed voice to a double reed timbre. Also, since the airflow is much more restricted through most double reeds, and the instruments tend to be straighter (rather than cones), lower values for the Damping/Decay and Absorption cutoff are appropriate. This will usually result in a voice that may be more difficult to play relative to the breath pressure and tonguing dexterity needed, which is arguably the most significant behavior difference in double reeds versus single reeds -- witness the single reed mouthpiece oboe for the beginning player. Its timbre is virtually identical to a standard oboe, but much easier for the beginner to play and learn Embouchure Control.
General Jet Reed Tips
Reference voice Init Jet
Definitive characteristics of the jet reed family are high Absorption cutoff, small Short Length values (either absolute or relative mode), Velocity Child Reed output, Child Reed Resonance Control relative mode, no Mouthpiece Narrowness, no or low reed Flexibility, and minimal Child Reed Resonance Amount. The Embouchure Controlling min/max settings for Child Reed cutoff will be centered around or near zero. Attack is controlled by the Slit Initial Aperture, as well as the Graham Function Argument and Driver output settings. Slit Initial Aperture is equivalent to the blow angle across the mouthpiece opening. Increasing the Slit Initial Aperture increases the blow angle down into the mouthpiece. Low Slit Initial Aperture values give more fundamental but usually a slower attack, while high Slit Initial Aperture values give a faster attack but more noisy non-linear chaotic components. To modify the attack speed, increase in small amounts the Slit Initial Aperture , Reed Flexibility and Driver output and decrease the Graham Function Argument.
The jet reeds are more tolerant to the generation of the chaos elements when the sum of the Graham and Driver output becomes more positive, and the Addition to Reed Aperture can control the noise components -- set negative to remove chaos/noise, set positive to increase. There is no Beat in jet reeds as there is no physical reed to collide with the mouthpiece, and Throat is also not typically used, as the player is not physically coupled with the instrument.
For a different example of jet reed mode behavior, reference the voice Jet Mode. This voice is initialized to second mode over its entire range, so that MW2 selects the typical mode frequencies of the Child Reed: first mode with MW2 at minimum, second mode with MW2 centered, and fourth mode with MW2 at maximum. Thus you can play the keys in the C5 to C5 range and have a full three octave range with the appropriate MW2 setting.
General Lip Reed Tips
Reference voice Init Lip
The typical structure for lips reeds includes low Absorption values, low pressure input gain and high pressure level to reed, use of the Parent Reed, and multi-mode total delay settings. The Short Length will tend towards lower values, and either absolute or relative mode for Short Length are appropriate. Reed Flexibility will usually be high, and the Slit Initial Aperture can have a wide range of moderate to high settings. The Child Reed will be in relative mode, with high Child Reed Resonance Amount values. The Child Reed Resonance Lag Time will be in the range of 1-10 for creation of the pitch sliding effect characteristic of quickly played notes for the lip reeds due to the muscle response time of the player's embouchure to select modes. The high/low limits of the Child Reed Resonance Frequency will be very wide, centered around zero for creating the brass mode 'shake' behavior with Embouchure Control.
There can be wide variation of settings for the Graham Function and Driver output level to affect the overall brightness and the attack characteristics, and these need to be adjusted inversely as noted previously -- decrease the Graham and increase the Driver output to create brighter timbre and faster attack. Because the lip reeds are multimodal instruments, care must be taken with the Short Length settings as certain modes will be very unstable or not sound with certain Short Length settings, and may also be difficult to tune. If you have notes that play different pitches depending on breath pressure articulations (soft gradual attacks vs. hard tongued attacks) or fast legato runs of adjacent notes (a scale plays different pitches playing up than playing down is a common example), then check the Short Length settings, as well as the Parent Reed cutoff frequency.
To accentuate the brightness of brass sounds, use the Harmonic Enhancer -- set the carrier high pass filter to about 75 or above using the 'normal' signal source, and set the overdrive amount to about 30 or above. Make sure the HPF settings approximately track the keyboard. The Impulse Expander can also be used to make the sound more 'metallic.'
Beat can also be used to accentuate the brightness, but often lip reed voices can 'misbehave' when tuning (jump modes right as you approach the desired pitch), so add Beat with careful attention to the Beat High Frequency Emphasis settings to keep the overall sound as in tune as possible.
General Bowed String Tips
Reference voice Init Bowed
The characteristic of approximating bowed string behaviors is setting the slit function parameters to mimic the bow sliding across the string. The hysteresis must be very high , with high values for the Reed Flexibility as well (set feedback balance = inner). This creates a force interaction between breath pressure and the reed that approaches the sawtooth shape of the bow sliding across the string. The Pressure level to reed parameter can be thought of as the bow angle, or how much of the bow surface is in contact with the string.
The sum of the Graham function and the Driver output will again be important, with the sum of these tending to be equal or less than zero if the Slit Initial Aperture is high, or positive if the Slit Initial Aperture is small. Again, the balance of the Graham Function with the Driver output influences the attack -- negative Graham with positive Driver output will attack faster than positive Graham and negative Driver output. Since pressure level to reed will usually be in the upper half of the parameter range, the pressure input gain should be negative or close to zero.
Settings for Damping/Decay and Absorption can be widely varied, but values of 90-110 for the Damping/Decay and values of 60-90 for Absorption work well. Short Length mode is best if absolute, and the values can be widely set anywhere from 130 to 190 depending on the Child Reed / Embouchure parameters. Child Reed Resonance Control mode should be relative, with the Child Reed Resonance Frequency set anywhere from zero to and octave above the fundamental. Child Reed Resonance Amount will typically be very low.
In addition, using Parent Reed output helps to define the noise-like nature of the 'bow scrape' transient, with the Parent Reed cutoff and Lip Collision governing the timbre of the 'scrape'. Higher Parent Reed cutoff with higher Lip Collision will give more 'bite' to the sound. Beat can also accentuate the 'bite' and make the sound brighter, but is best used in small amounts so it doesn't mask the behavior.
Because such specific Instrument Page settings are needed for the bowing behavior approximation, timbre tweaks are best left to the tap, Harmonic Enhancer, EQ and Impulse Expander/Resonator. Tap mode should be key track. Use roughly equal amount of linear output and tap output. Notice that the Init Bowed example uses only EQ. Try setting the Harmonic Enhancer balance to full wet, and turn on the Impulse Expander and Resonator and listen to the timbre change.
For the adventurous, use Throat as a timbre tweaker, but be aware that the low pressure behavior will may change (use BC to control Throat amount, or you may set a fixed value).
General Plucked String Tips
Reference voice Init Pluck
This is basically a purely Pipe system sound, because once the string has been plucked, there is no longer any interaction between the string and the driver. The driver can either be a short transient generated by the Child Reed, Breath Noise or Excitation. Note that the sound will always decay to zero, regardless of the Absorption and Damping/Decay values.
There are three ways to generate the pluck. One is by Breath Noise, where an ADSR pressure EG that decays at maximum rate to zero creates a short 'burst' of noise that excites the linear system. Another is using the Child Reed, again controlled by a fast decaying ADSR pressure envelope. The last is using the Excitation wave, with maximum output of excitation to pipe. Interestingly, there is a fourth way that entails no driving source other than the algorithm in 'transition' state itself -- If you set the pressure input gain, slit initial aperture and Driver output level to maximum, use an AR envelope and 127 for all rates, set the Damping/Decay key off value to zero, and the Driver output shut off to through. As long as the system interpolate speed is not too slow, every note on will generate enough energy to drive the Pipe system!
The example Init Pluck has Element 1 "Excite" as an example of the Excitation method, and Element 2 "Fricative" as an example of the Breath Noise method. Adjust the volumes on the Common Miscellaneous page and notes the differences -- these are the same linear system settings with the only changes being the method used to excite the Pipe into resonation.
The Excitation method is the most versatile method to use. First, you have greater timbral control because the overall timbre is controlled by three areas of the model -- the Short Length, the excitation pulse width and the Tap output settings. The Breath Noise method only has two of these available -- the Short Length and the Tap. For the Tap parameters, use variable mode for the Tap position fix, mix roughly equal level of the linear and Tap output, and use the ratio of Tap position as the timbre modifier. Second, the pulse width excitation wave has it's own dynamic amplitude and filter control independent of the global Dynamic Filter and Amplifier/Filter EG.
Lastly, and most importantly, the pressure EG can have sustain level with the excitation method and the voice will still behave as plucked -- the Breath Noise and Child Reed methods will not work with non-zero sustain. This will allow for the creation of plucked sound that can have infinite sustain by proper settings of Parent Reed, Child Reed and Beat. Reference ExciteBeat. In this example, the excitation supplies the initial energy for the attack, and Beat supplies additional energy to the system to maintain it's sustain indefinitely. The timbre is controlled by Short Length, with subtle attack variation by changing the excitation pulse width.
Be careful when adding Beat that the High Frequency Emphasis is set to match the tuning and pitch tracking of the total delay settings. You'll notice that small changes in the Beat High Frequency Emphasis will change the tuning of notes.
MISCELLANEOUS TIPS THAT WORK,
BUT WITH NO SCIENTIFIC BASIS WHATSOEVER
Tip #1
Faster Attacks -- First check the Pressure EG and see if Attack Rate 1 and 2 are set to maximum (127). Note that even if both are already set to 127, the envelope can in fact be faster if you increase the attack rate offset parameter. If this is not sufficient, then go to the Instrument Page. The first adjustment should be to the Graham Function Argument and the Driver output level. Decrease the Graham and increase the Driver output by the same amount. You can also increase the Pressure level to reed. WARNING: If the pressure input gain is already high, increasing the pressure level to reed can actually slow the attack.
Second, you can also raise the Mouthpiece Narrowness and Slit Initial Aperture a bit.
Third, keep in mind that shorter Short Length typically settings attack slower than longer Short Lengths -- so you could also increase the Short Length a bit.
Tip #2
Keep in tune -- often. It's very easy to get so involved with creating a behavior and timbre, you gradually create a voice that is very out of tune. Remember that the tuning software alters the Pipe system portion of the VA algorithm. Since a given behavior/timbre/pitch relies on the relative values of both the Pipe and Driver system parameters, tuning the voice can destroy the behavior and timbre for which you worked so hard when it tries to correct the pitch. Make sure you often re-initialize and re-tune the voice BEFORE the pitch drifts too far from the desired tuning while you are creating of desired behavior and timbre. This will avoid spending too much frustrating time in "The Circle of Life."
Tip #3
If you ignore Tip #2, you may find that you can't tune the voice to concert pitch via "The Circle of Life" without completely destroying it's behavior/timbre character. Consider creating a 'key' voice, i.e. a B-flat clarinet where the element must be transposed by Element note shift on the Common Miscellaneous page to play in concert pitch. After all, consider how many orchestral instruments play in keys other than C. The reason is that physically changing the instrument to play in concert pitch ruins it's timbre and behavior !
Tip #4
Investigate the upper modes. You can have a very uninteresting sax-like single reed sound that magically becomes a gorgeous ethnic double reed if you simply initialize it to play in second and fourth modes instead of first and second modes. Also try creating a sound that plays only in third, fourth or fifth etc. mode. Adjust the Element note shift on the Common Miscellaneous page accordingly for proper transpose correction, if it is needed. Reference the voices Mode 1, Mode 2, Mode 3, Mode 4. Mode 5 and Mode 6. These have the exact same voice parameters with the exception of their total delay / mode settings. Notice the differences in timbre and behavior.
Tip #5
Multi-mode sounds (brass) favor low Absorption values to enhance the selection of the various modes via the Child Reed. Remember that low Absorption values correspond to a straighter tube with a greater bell flare, as in brass instruments. While you may think that such low Absorption values would result in a dark sound, the addition of Parent Reed output, Lip Collision, and the proper values for Graham Function Argument, Driver output, Slit Initial Aperture and Reed Flexibility will restore much brightness. Correspondingly, the Short Lengths settings will tend to the shorter values as well.
Tip #6
Use Throat as a timbre modifier. Set a fixed value for Throat between 90-110 on the controller page. Then use the Throat Delay, Intensity, Amount, HPF and LPF settings to alter the timbre by creating beats, subtones and other small inharmonicities in the sound. Especially useful for string timbres -- reference Init Bowed, and assign Breath Pressure to control Throat, and listen to the subtle timbre change below G3. It is best to add Throat early in voice creation after you have created a basic stable sound and before you do your final timbre and behavior tweaking . It can alter the behavior in unpredictable ways, so you want the Throat Formant's contribution to the total sound while doing your holistic final tweaking.
Tip #7
Often when tweaking the Compensation to achieve proper low breath pressure pitch tuning, you may notice that the sound may varies sharp and/or flat while progressing from the low pressure pitch to the maximum pressure pitch. This usually occurs when the Compensation values start getting high. To help correct this phenomenon, note the interaction between the Compensation settings and the Pressure to Reed Thickness and Pressure to Reed Resonance values. Raise the Pressure to Reed Thickness and Pressure to Reed Resonance and decrease the Compensation to help smooth out the pitch instability. Note that sometimes the pitch/pressure behavior contribution from Pressure to Reed Thickness and Pressure to Reed Resonance is backwards. If so, then decrease them as well as decreasing the Compensation values. If it is still stubborn, try a 1-2 decrement in the Short Length and try again.
Tip #8
Since acoustic instrument resonating bodies are complex formant filters, it is very useful to use the EQ portion of the Element Effects to set up bands of boost/cut with very high Q settings and high boost/cut amounts. However, be aware of overdriving the EQ -- It can impart a diffuse, fuzzy character to the sound. To correct, lower the input into the EQ portion, and use the post EQ boost.
Tip #9
Many acoustic instrument exhibit weak fundamental frequency energy. Also, usage of sounds in ensemble with other sounds and instruments usually requires 'thinning' of the sound so all work well together in a mix. Use the EQ's high pass filter to attenuate the fundamental if necessary.
Tip #10
Tune using the BC while blowing in your breath pressure 'comfort zone' using Edit 1 Key. This allows for you to play in-tune pitches if your comfort zone is below maximum pressure (remember that the autotuning software for maximum pressure). Also, this gives you the advantage to play slightly sharp with maximum pressure, which is a natural acoustic effect. When used in conjunction with BC controlled Throat or Scream amount, it creates much more realistic 'overblow' effects when actually overblowing.
Tip #11
Use Breath Attack to control Scream to accentuate tonguing effects. The Attack Time constant should be relatively fast, less than 200 msec., with the gain at 90 or above. Set the curve relatively high so that only hard-tongued notes bring in the effect. Set the depth relatively small as Scream is pretty powerful -- values less than 15, but realize than this can be higher if the Breath Attack Gain is low. Useful for adding 'splat' in tonged brass attacks.
The Last Tip
Ignore everything presented here any try random experimentation. The are hundreds of happy accidents still waiting to happen inside of VL. The 'perfect' saxophone may be hiding within a variance of 10 values each across a dozen different parameters from a sickly, difficult to play party kazoo -- And no amount of logical thinking will get you there.
THE CIRCLE OF LIFE
The final polishing and fine tweaking of a voice is based on trying to maintain the desired timbre and behavior while also playing the proper tuning. Because of the integrated pitch --> timbre --> behavior interactions, tweaking of a voice to maintain a specific pitch with a specific timbre with a specific behavior requires a patient, systematic approach. The core parameters dealt with here will be Short Length, Absorption, and Child Reed Resonance frequency along with the Pipe Length setting. A collateral parameter set will be the Tap output parameters.
The following example is very common with VL -- you created a sound you like for a given range of notes where the timbre and behavior is how you desire. Unfortunately, the pitch on the given note range is flat (sometimes quite a bit). You run the auto-tune software and one of two things happens:
A) The note is tuned, but the timbre and the behavior has changed
B ) The note cannot be tuned to the proper pitch, and still the timbre and behavior is altered.
The approach to fix A) with a pitch that is flat is as follows. First, exit the tuning mode WITHOUT saving the auto tuning results, then:
1. Increase the Child Reed Resonance frequency for the affected range a few (2-3) values.
2. Decrease the Short Length for the affected range a few (2-3) values.
3. Temporarily save the voice to the MI buffer
4. Tune the notes sharper using the Edit 1 Key mode and tune manually -- play the note repeatedly as you tune so you can hear the resulting changes in pitch, timbre and behavior. If the behavior or timbre starts to change noticeably, back down a few tuning values and proceed to the next note(s). When the range is finished, save all conditions and exit tuning.
5. Increase the Absorption 1-2 values.
6. Return to the tuning mode and use Edit 1 Key to again try to tune, playing repeatedly to verify behavior consistency. If proper tuning is achieved and the behavior is acceptable, then go to 7). If behavior is again lost when the note(s) are tuned, then go to step 8). Save all conditions and then exit tuning mode.
7. Adjust the ratio of Tap position and Tap output values to make any necessary timbral correction in the given key range, and adjust final EQ and Impulse Expander/Resonator settings if desired.
8. If behavior was again lost when pitch(es) were tuned correctly, the difficulty lies in an overall imbalance of many other parameters. Make small (1-3) value increases in the pressure input gain, pressure level to reed, Driver output level and Child Reed Resonance Frequency. If Parent Reed is being used, then decrease lip collision and increase the Parent Reed cutoff a few (2-3) values.
9. Return to the tuning mode, re-initialize the range, and start tuning via Edit 1 Key, and return to step 1).
10. Repeat 1-10 as necessary.
If the original situation was that the note(s) were sharp prior to tuning, then the same protocol applies with the opposite direction for the adjustments of the relevant parameters.
With situation B) above, the problem will usually lie in the settings for Throat, Beat and Parent Reed. Sounds that derive a significant portion of their harmonic structure or behavior from these areas are often very difficult, if not impossible, for the tuning algorithm to auto tune, because their pitch is determined by parameters that are not tuned by the autotuning algorithm.
You must tune via Edit 1 Key, but the important adjustments are the settings in the Beat, Throat Formant and Parent Reed, even before you attempt the Edit 1 Key tuning. Your goal is to get the note as close to in tune as possible before changing the Pipe Length settings, with keeping the behavior as near to the desired behavior as possible. The first adjustments should be made to the Beat High Frequency Emphasis. Raising the HFE value will make a flat note more sharp.
The same applies to Throat -- small adjustments in the Throat pitch and LPF/HPF can help tune the note as well. The Parent Reed cutoff can be adjusted, but it's overall effect will be limited by it's output value, and of course, the Lip Collision amount. If you need to raise the Parent Reed cutoff, it will be likely that you may have to lower the Lip Collision.
When these adjustments get you close, then go back and run around the "Circle of Life" as described above.
EMBOUCHURE CONTROLLING TABLES
Below are the general relationships for the Max/Min settings of the Embouchure Controlling parameters. When assigning to a MIDI controller, Tight Embouchure is at controller maximum, and the Loose Embouchure is at controller minimum. Note there is no table for Plucked Strings, as the only variation is the force of the initial pluck, as there is no interaction with the system after excitation. The plucking force is the Excitation amount or Fricative amount. Excitation is controlled by velocity directly. In the case of Fricative, it has it's own MIDI controller (if fricative control balance is set to 'controller') or by velocity scaled Pressure EG (if fricative control balance is set to Slit).
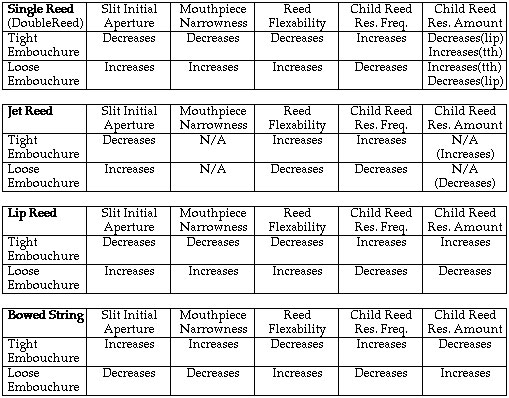
Keep in mind that the purpose of Embouchure Control is to create your desired timbral/behavior change with controller position. Use these tables as a guide only -- feel free to deviate to obtain your desired real-time timbre/behavior control.
|
 |
Manny Fernandez has been involved with sound programming and synthesizer development for over 30 years. Initially self taught on an ARP Odyssey and Sequential Pro-One, he also studied academically on Buchla modular systems in the early 80's. With that solid background in analog synthesis, he then dove into digital systems with release of the original DX7. Along with his aftermarket programming for Sound Source Unlimited, he is well known for his factory FM programming work on Yamaha's DX7II, SY77, SY99, FS1R and DX200 as well as the VL1 and VL70-m physical modeling synthesizers. Other Articles by Manny: https://yamahasynth.com/author/mannyyamaha-com/ |
Click here for Patchman Music VL1 & VL1-m Soundbanks
Click here for info on the Patchman Music VL70-m TURBO VL Upgrade Chip
 |
Be sure to check out the amazing Aerophone Academy Podcast co-hosted by Patchman Music's own Matt Traum and Alistair Parnell (iSax Academy) for in depth discussions and interviews on everything related to wind controllers! |


|
Check out the INCREDIBLE PATCHMAN TURBO VL Upgrade Chip for the Yamaha VL70-m |

This page was last updated Wednesday, November 5, 2025
Copyright ©1996-2025 PATCHMAN MUSIC, LLC, All Rights Reserved
Purchase Terms and Conditions
All trademarks are property of their respective holders