AKAI EWI EVI Fingering Mode

|
|
|
|
|
|
|
|
|
|
![]()
![]()
![]()
![]()
![]()
![]()
![]()
![]()
![]()
![]()
![]()
![]()
![]()
![]()
![]()
![]()
![]()
![]()
![]()
![]()

|
|
|
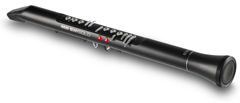
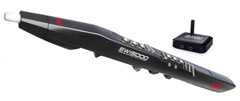
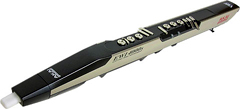
The Akai EWI SOLO, EWI5000, EWI4000s, and EWI USB feature multiple fingering options including Sax, Traditional EWI, Flute, Oboe, and the amazing new "EVI Fingering Mode" adapted by Patchman Music's own Matt Traum from Nyle Steiner's original EVI system which allows EVI and brass players to easily play this instrument with brass-style fingerings! The Akai EWI SOLO and EWI5000 feature a built in sample-based synth right inside the horn! They also feature various methods of connecting to external synths and soft synths. The built in synth is great! Just plug a pair of headphones into the EWI's headphone jack and you are playing anywhere anytime! Patchman Music sells the EWI SOLO and EWI5000. Click here for complete details. The Akai EWI4000s features a fully editable Analog Modeling Synth with effects built right into the horn! It also features MIDI IN and OUT jacks on the body of the horn as well as Octave and Hold modes for polyphonic playing and battery operation for complete portability. Just plug a pair of headphones into the EWI's headphone jack and you are playing anywhere anytime! Patchman Music offers an amazing new upgraded soundbank for the EWI4000s. Click here for complete details and an mp3 audio demo. The Akai EWI USB is a low cost USB controller that hooks up to your computer via a USB cable. It also includes a softsynth that runs on your Mac or PC with lots of useful sounds. Patchman Music is THE leading wind controller dealer in the USA. We sell both of these EWI models and personally calibrate each and every horn before it ships so you can be sure it will be ready to play right out of the box. Email Matt at Patchman Music to order yours today or click here for more info on these exciting musical instruments. |
This page explains the special "EVI Fingering
Mode"
found on the Akai EWI SOLO, EWI5000, EWI4000s, & EWI USB
found on the Akai EWI SOLO, EWI5000, EWI4000s, & EWI USB
![]() EVI Fingering Mode
EVI Fingering Mode
In addition to the standard EWI woodwind fingering system, the EWI SOLO, EWI5000, EWI4000s, and EWI USB also feature Sax, Oboe, Flute, and the innovative new EVI (electronic valve instrument) brass-style fingering mode. For the first time in history, both woodwind AND brass players can play the same wind instrument with totally different fingering systems simply by changing one parameter! The brass-style EVI fingering mode, lets EVI and brass players play the EWI SOLO, EWI5000, EWI4000s, and EWI USB with minimum effort. EVI players will find EVI fingering mode quite familiar since all of the EVI fingerings and Trill Keys are available in this system. Brass players with no EVI experience will also find the EVI fingering mode easy to understand since much of it is similar to an actual brass instrument. With a moderate amount of practice, brass players can learn this fingering system and be enjoying the EWI SOLO, EWI5000, EWI4000s, and EWI USB much faster than if they had to learn woodwind fingerings.
![]() Overview
Overview
The EVI Fingering Mode on the EWI SOLO, EWI5000, EWI4000s, and EWI USB was designed for the EWI form factor by Patchman Music's Matt Traum to follow as closely as possible the well-established EVI fingering system which was developed in the mid-1970s by EVI / EWI inventor Nyle Steiner. The EVI's fingering system was originally conceived by Nyle Steiner as a way for brass players to play a music synthesizer with fingering techniques they already knew- a concept that was quite radical at the time. To an experienced brass player the EVI fingering system may seem a little odd at first glance, but rest assured that the system is very logical and well thought out. It was so well thought out that it has essentially remained unchanged and has become a standard in its own right. Though the EWI SOLO, EWI5000, EWI4000s, and EWI USB may not be a true EVI in shape and this fingering system must conform to the physical layout of the EWI keys, the EWI SOLO, EWI5000, EWI4000s, and EWI USB EVI fingering system does work extremely well. It has been carefully adapted to the EWI's woodwind key form factor as well as possible. Because of this careful design, NONE of the abilities of an actual EVI are lost in this adaptation. In fact, a few added possibilities become available with this system such as playing up a half step simply by lifting one of the left hand fingers. Automatic "outside" jazz licks and playing in C# is easy!
![]() EVI Fingering Explained
EVI Fingering Explained
The following is an overview of how the EVI fingering mode works. On a wind controller, embouchure is not used to change octaves and half octaves. Instead, we do this with the left hand. The desired octave is selected with the rollers located on the underside of the EWI SOLO, EWI5000, EWI4000s, and EWI USB. The left hand thumb rolls between these rollers to select the octave. Note that you always place the thumb in the groove between two rollers so that you are actually touching two rollers at all times (except on the EWI USB's outermost octaves whereby you touch just the outer roller). By "half octave" we are referring to whether a right hand open fingering sounds a "C" or a "G" for example. This is selected the same way for every octave- that is- by either touching the left hand index finger key to select a "G" or not touching it to select a "C". The right hand then can finger downward chromatically from this "C" or "G" as on a trumpet. Fingering on the right hand is always like the lowest octave of a trumpet in ALL octaves- that is, every D is fingered 1 and 3, etc... Since every octave is fingered exactly the same, you only need to learn one octave to master the fingering system for the entire range of the instrument. In this regard, the EVI fingering system is actually more logical and easier to learn than on an acoustic trumpet which is different in every octave.
![]() How To Select EVI Fingering Mode
How To Select EVI Fingering Mode
Note: EWI4000s OS Version 2.0 or higher is required for this EVI Fingering Mode. You can download the latest EWI4000s OS here. All Akai EWI USB and EWI5000 units include this EVI fingering option.
EVI Fingering Mode is selected with the FINGERING "Fn" parameter. This parameter has several options (as of EWI4000s OS v2.4) including EWI, Sax, Flute, Oboe, and EVI. The "Ev" and "Er" settings are the EVI fingering options. On the EWI USB, the fingering options are selected in the EWI Configuration screen that is part of the Aria software included with the EWI USB.
"Ei" is the standard EWI fingering system.
"SA" is the slightly more Sax-like fingering.
"FL" is the Flute fingering. (Included with all EWI SOLO, EWI5000, EWI USB units. EWI4000s OS v2.4 or higher required)
"Ob" is the Oboe fingering. (Included with all EWI SOLO, EWI5000, EWI USB units. EWI4000s OS v2.4 or higher required)
"Ev" and "Er" are the two EVI / Brass fingering modes. Both are identical except for the direction of the octave rollers. Both directions are provided to allow the user to choose which is most comfortable...
"Er" = EVI with reversed direction rollers. This mode most closely duplicates the movement of the left hand wrist on an actual EVI. This is the recommend fingering mode for experienced EVI players.
"Ev" = Uses the same roller direction as in EWI fingering mode. "Ev" mode may be useful to experienced EWI players who wish to experiment with "brass-type" fingerings yet keep their already-learned EWI roller technique.
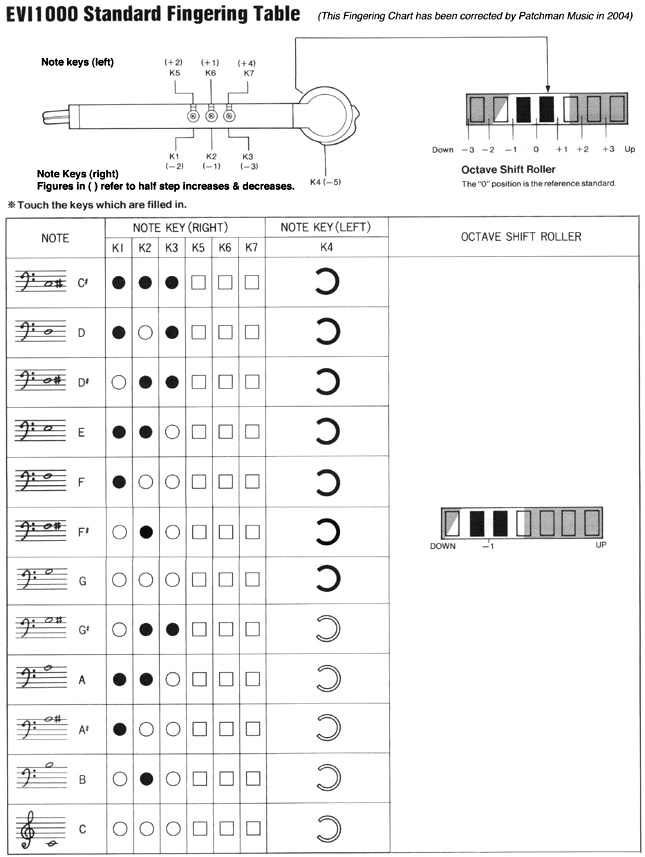
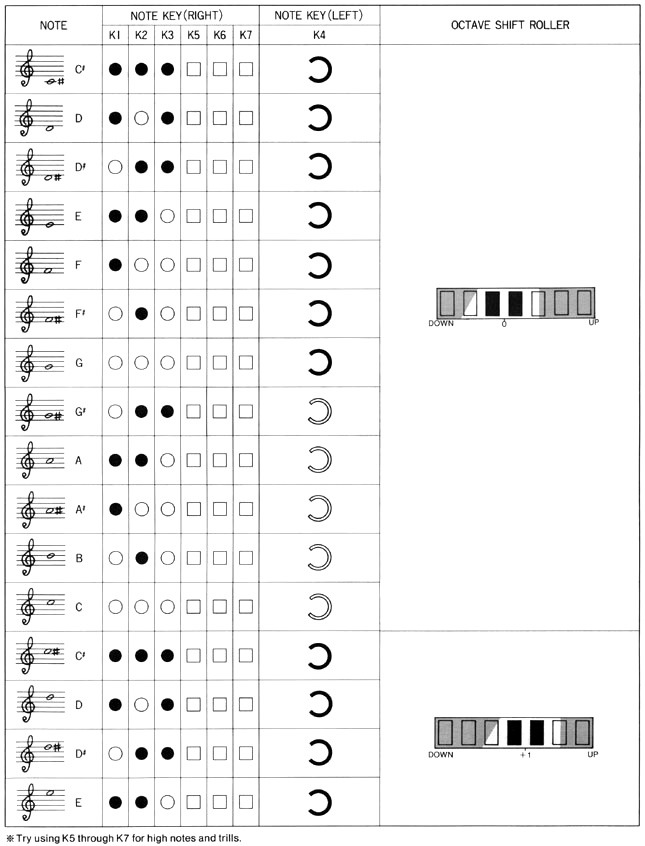
Please refer to this chart for the key numbering described below. Please note that the EVI numbering system shown below is different than the EWI numbering system.
![]() The Right Hand
The Right Hand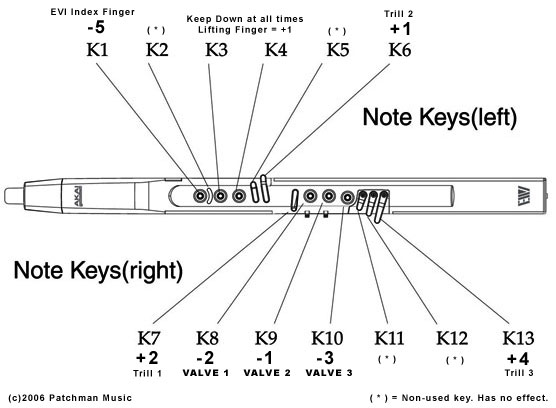
The right hand controls the 3 "valves" as well as the EVI 1st Trill Key and EVI 3rd Trill Key. The right hand thumb also controls pitchbend up and down sensors. Vibrato is done by gently wiggling the mouthpiece with your teeth.
The right hand index, middle, and ring fingers activate the 3 "Valve" keys (keys 8, 9, and 10) as one would on a trumpet or similar valved brass instrument...
Key 8 lowers the pitch -2 half steps when touched.
Key 9 lowers the pitch -1 half step when touched.
Key 10 lowers the pitch -3 half steps when touched.
Keys 11 and 12 are non-functioning and provide a place to rest the right hand pinky finger.
Key 13 functions as the 3rd Trill Key on the EVI. It raises the pitch +4 half steps when touched.
Key 7 acts as the EVI 1st Trill Key which raises the pitch +2 half steps when touched.
EVI players may be wondering where the 2nd Trill Key is. The equivalent of the EVI 2nd Trill Key is activated by the left hand in several ways as explained below.
![]() The Left Hand
The Left Hand
The left hand controls the octave, half octave, and EVI 2nd Trill Key (+1/2 step up). The left hand thumb also controls the glide/portamento sensor (EWI SOLO, EWI5000, EWI4000s only).
The player normally grips the EWI SOLO, EWI5000, EWI4000s, and EWI USB with the left hand and normally touches keys 3 and 4 all the time. This provides a comfortable firm grip.
Key 5 is non-functioning and it acts as a "barrier" to help prevent glitches.
Key 6 acts as the EVI 2nd Trill Key. It raises the pitch +1/2 step when touched. By lifting either key 3, or lifting key 4, or touching key 6, or any combination of these three keys, raises the pitch a maximum of +1/2 step. These three keys are not additive.
Key 1 takes the place of the canister index finger button on an EVI. Touching it lowers the pitch a fourth (-5 half steps). Think of this Key as the 4th valve on some brass instruments or the left hand thumb "F attachment" on a trombone.
Key 2 is a non-functioning key and acts as a "barrier" to help prevent glitches.
![]() What Are Trill Keys?
What Are Trill Keys?
With only 7 right hand fingering combinations and 12 chromatic notes to cover, one must "crossover" to the next half octave halfway through the octave. There are two crossover points where both the right and left hands change at the same time. These points are in the middle of the octave between "G" and "G#" and the other is between "C" and "C#". Since multiple fingers on both both hands are changing at the same time, "C" TO "C#" being the most difficult using 5 finger changes, these crossover points can be tricky to play or trill between consistently without glitching and this is why we have the 3 "EVI Trill Keys". The trill keys make several note transitions easier and smoother to play since they actually RAISE the pitch. So instead of having to move 5 fingers at exactly the same time to trill from "C" to "C#", you can simply finger a C and use the 2nd Trill Key to play the "C#". Much easier! As you gain more experience playing the EVI fingering mode, you will come to appreciate and use the Trill Keys more and more. Trill Keys can also be used in combination with other Trill Keys or "Valve" keys for alternate fingerings and making difficult musical passages easier to play. One advantage this adapted system has over an actual EVI is that the left hand 1/2 trill keys can be utilized while playing. Lift your left hand finger and you have instant automatic "outside" jazz licks played 1/2 step up! Need to modulate to C#? Lift the left hand trill key and continue playing in C.
![]() Octave Rollers
Octave Rollers
The Octave rollers are used to select the octave. The direction of the rollers is user selectable. The pitch jumps by octaves as you move your thumb along the rollers. You select the direction by selecting either "Ev" and "Er" while editing the FINGERING "Fn" parameter. Both directions are provided to allow the user to choose which is most comfortable...
"Er" = EVI with reversed direction rollers. This mode most closely duplicates the movement of the left hand wrist on an actual EVI. This is the recommend fingering mode for EVI players.
"Ev" = Uses the same roller direction as in EWI fingering mode. "Ev" mode may be useful to experienced EWI players who wish to experiment with "brass-type" fingerings yet maintain their already-learned EWI roller technique.
![]() Basic EVI Fingerings
Basic EVI Fingerings
Here are a few fingerings to get you started:
Place your left hand thumb between two rollers. "C" is played by touching only keys 3 and 4. Note that 3 and 4 are normally held down at all times so this is considered the "open" fingering (no valves down).
Now touch your left hand index finger to key 1 and you have a "G".
Use the three right hand "Valve" Keys 8, 9, and 10 to "finger downwards" from C or G.
When fingering down from C, proceed until you get to Ab. To go from Ab to G simply touch the left hand index finger and release the right hand fingers at the same time. Now proceed to finger down to C#. To go from C# down to C, release the left hand index finger and all the right hand fingers and roll your left hand thumb to the next octave roller all at the same time.
All fingerings are the same for every octave (except for the octave rollers). Right hand fingerings are the same as found on a trumpet in the lower octave from middle C up to the C on the staff. For example C# is always played with keys 8, 9, 10. D is always played with keys 8, 10, etc. You only need to learn this one octave and you will have mastered the entire range of the instrument!
When learning the EVI fingering mode, it might be useful to see fingering charts which were developed for the older Akai EVI1000. The fingerings also apply to the EWI SOLO, EWI5000, EWI4000s, and EWI USB when in EVI Fingering Mode (though the key numbering and physical locations are different). The EVI1000 fingering charts are shown below.
Have fun!
Matt Traum
Patchman Music
Longtime EVI Player Steve Anderson Comments on EVI Fingering Mode...
|
 "The
Fedex man dropped off my new EWI4000s from Patchman Music today.
I have to say... I am pretty damn impressed! Built like a tank
and some great features. I have to completely take my hat off
to Matt for the work he did in designing the EVI fingering modes.
Very nice work Matt... and Akai! I opened the box and pulled
out the new EWI and put on the alien neckstrap thingy. I fired
it up in EVI reverse roller mode and positioned my hands and
began what started as an initial awkward feeling of having the
EWI in my hands. That lasted all of four minutes, as my EVI reflexes
kicked in and I was running scales up and down the EWI as if
I had played it for years (Matt can testify - I played for him
over the phone!:). That has to be the shortest learning curve
ever, thanks to the EVI fingering mode. I could seriously play
a gig passably with this thing tomorrow. It's that intuitive.
The reverse roller set-up works perfectly, though it initially
felt awkward until something just 'kicked in'. Then I was off
flying. What a weird feeling! The mouth vibrato is strange, but
starting to grow on me and I can still do a decent thumb vibrato
just using the PB down plate. So really, the best of both worlds.
The EWI 4000s synth is sweet! Lots of great, fat sounds. I definitely
like the new EWI, though, in my heart, I would still love an
EVI version of this sucker. Still, no reason for an EVI player
NOT to get an EWI in light of the EVI mode. It rocks that much!
Thanks again to Matt and other EVI players that were early adopters
recommending the EWI4000s to me. Your advice was right on the
money."
- Steve Anderson, EVI Virtuoso,
"The
Fedex man dropped off my new EWI4000s from Patchman Music today.
I have to say... I am pretty damn impressed! Built like a tank
and some great features. I have to completely take my hat off
to Matt for the work he did in designing the EVI fingering modes.
Very nice work Matt... and Akai! I opened the box and pulled
out the new EWI and put on the alien neckstrap thingy. I fired
it up in EVI reverse roller mode and positioned my hands and
began what started as an initial awkward feeling of having the
EWI in my hands. That lasted all of four minutes, as my EVI reflexes
kicked in and I was running scales up and down the EWI as if
I had played it for years (Matt can testify - I played for him
over the phone!:). That has to be the shortest learning curve
ever, thanks to the EVI fingering mode. I could seriously play
a gig passably with this thing tomorrow. It's that intuitive.
The reverse roller set-up works perfectly, though it initially
felt awkward until something just 'kicked in'. Then I was off
flying. What a weird feeling! The mouth vibrato is strange, but
starting to grow on me and I can still do a decent thumb vibrato
just using the PB down plate. So really, the best of both worlds.
The EWI 4000s synth is sweet! Lots of great, fat sounds. I definitely
like the new EWI, though, in my heart, I would still love an
EVI version of this sucker. Still, no reason for an EVI player
NOT to get an EWI in light of the EVI mode. It rocks that much!
Thanks again to Matt and other EVI players that were early adopters
recommending the EWI4000s to me. Your advice was right on the
money."
- Steve Anderson, EVI Virtuoso, Wind Controller Soundbanks from Patchman Music
 |
Be sure to check out the amazing Aerophone Academy Podcast co-hosted by Patchman Music's own Matt Traum and Alistair Parnell (iSax Academy) for in depth discussions and interviews on everything related to wind controllers! |


 |
Check out the INCREDIBLE PATCHMAN TURBO VL Upgrade Chip for the Yamaha VL70-m |

This page was last updated Wednesday, August 6, 2025
Copyright ©1996-2025 PATCHMAN MUSIC, LLC, All Rights Reserved
Purchase Terms and Conditions
All trademarks are property of their respective holders